How to grow great vegetable seedlings
Growing your vegetable seedlings can be a lot of fun. there is something very whole in eating the salad you grew yourself, from the seedling you germinated on your own, in the planter you built all by yourself. if you only want to see how a seed germinates, you don’t need this article- just go with your intuition. it will germinate. but if you want to grow real good seedlings, that will justify your time and effort, you should know what you are doing. otherwise, in my opinion, you are better off with nursery-bought starter seedlings
Practice
The theory behind seed starting is fairly complex. however, the practice is simple:
- mix fresh peat moss potting mix with organic worm compost on a 1:10 ratio
- fill your seedling tray with the dry mix. tap it on the table to release any air cavities, and re-fill
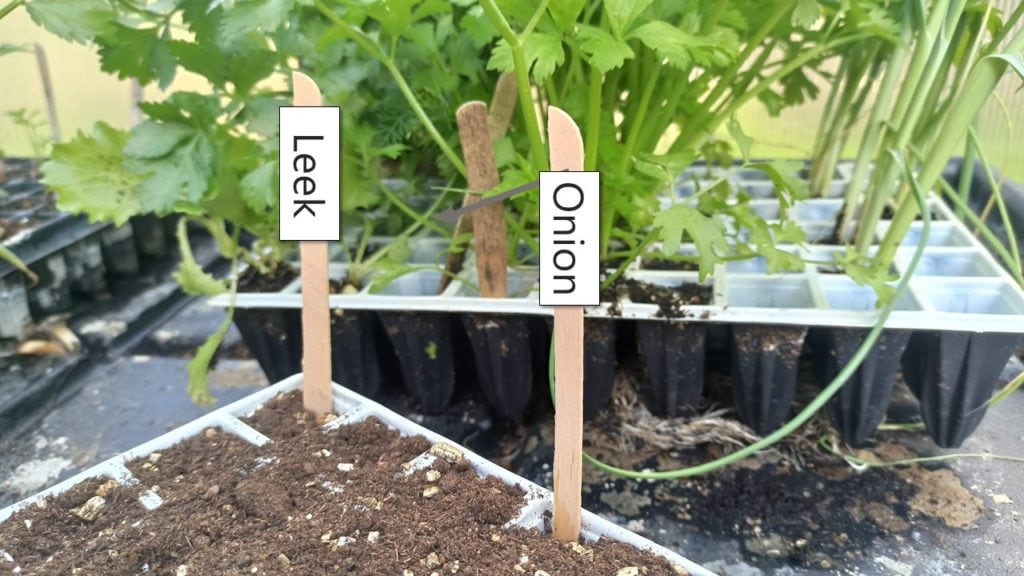
- select your seeds: prefer young seeds collected last season. mark the variety and the date on a wooden stick
- spread the seeds in rows. pay attention to the seed quantity: large plants (like tomato and pumpkin) should be seeded one seed a slot, while smaller, grass-like plants (such as parsley and chives) will prefer to grow in a more dense environment. do not press on the seeds!
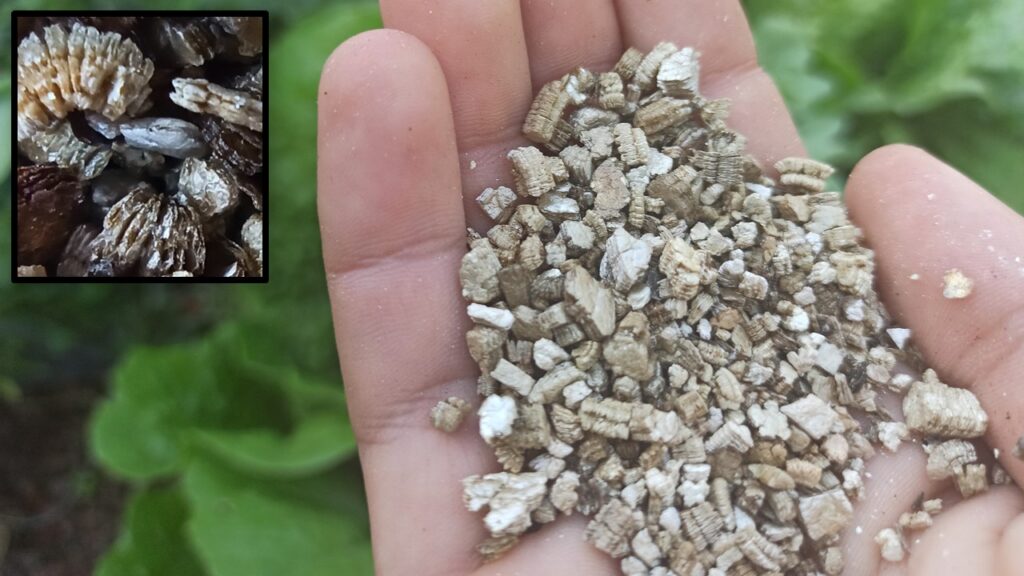
- when all of the seeds are in place, spread on top a thin layer of vermiculite. the vermiculite will cover the seeds and will hold moisture next to them.
- soak the mix with water. you can use a shallow plastic tray filled with water: just put the seedling tray in it and let it soak. store the seedling tray indoors and check it daily.
- the moment your seeds start to crack open, they must be exposed to sunlight. you can put them next to a sunny window or just take them outside if the weather allows

Theory
seedlings can have a lot of (allegedly) minor defects, that in practice can become a big issue further in the growing season. unlike other aspects of gadening, when it comes to seedlings you should always use the best seedling you can possibly get.
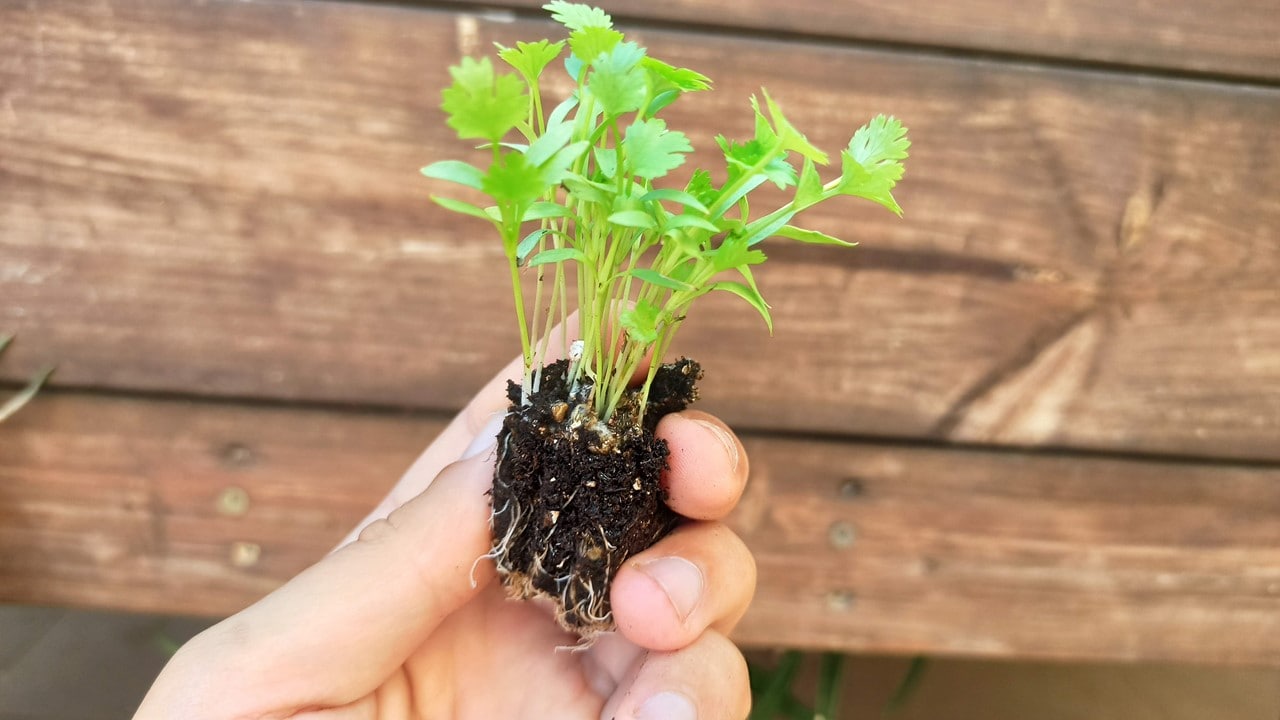
A good seedling will have:
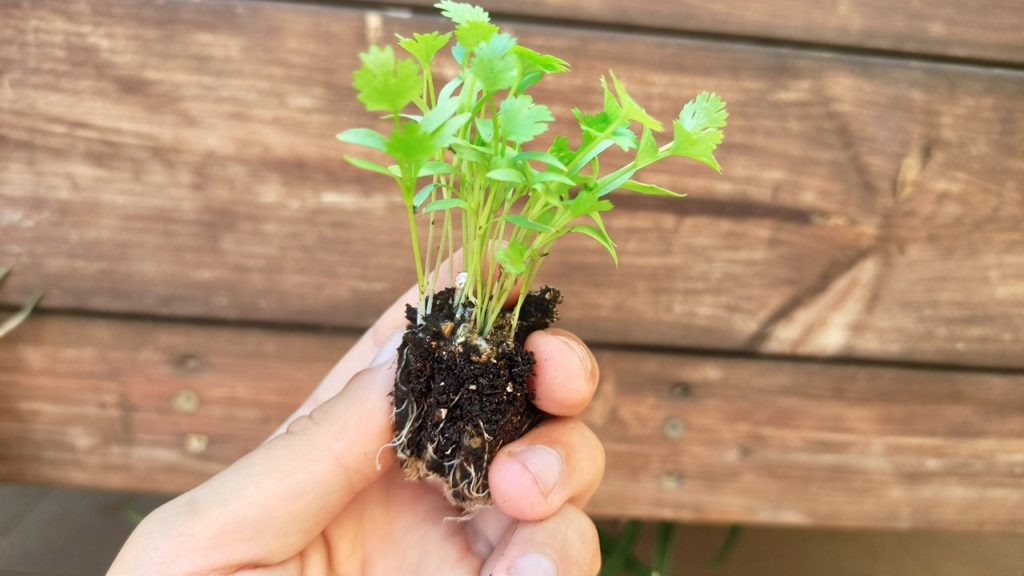
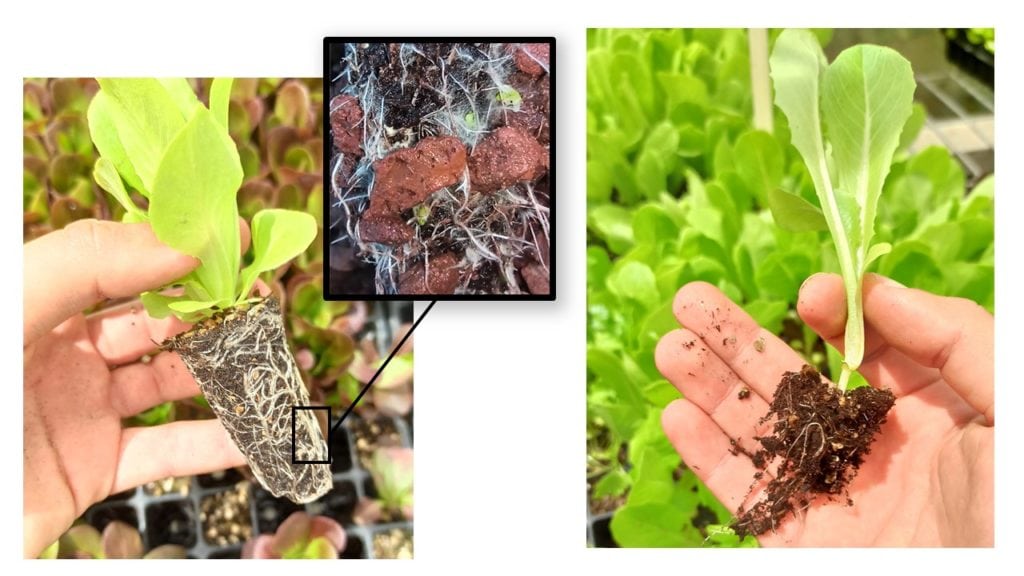
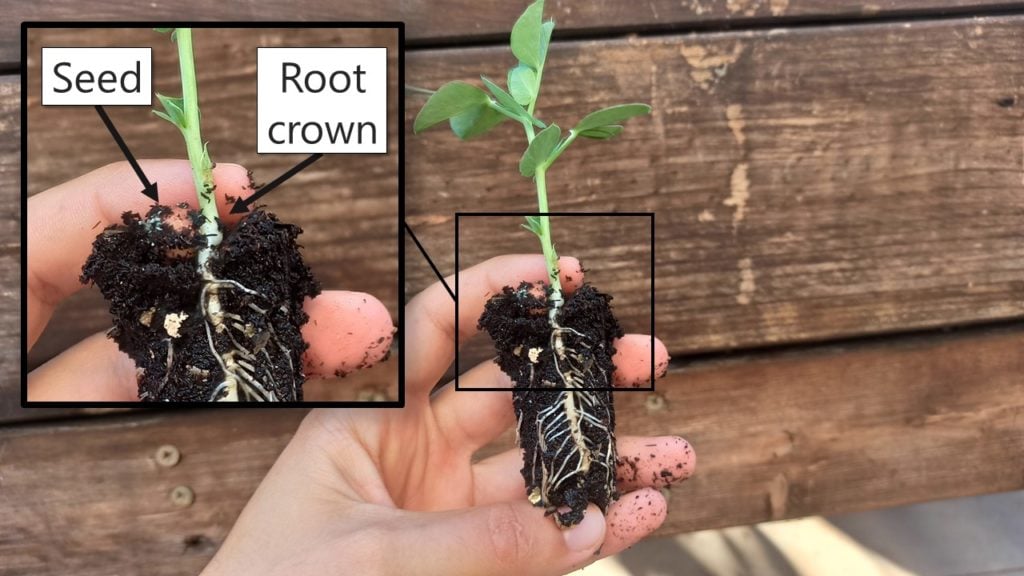
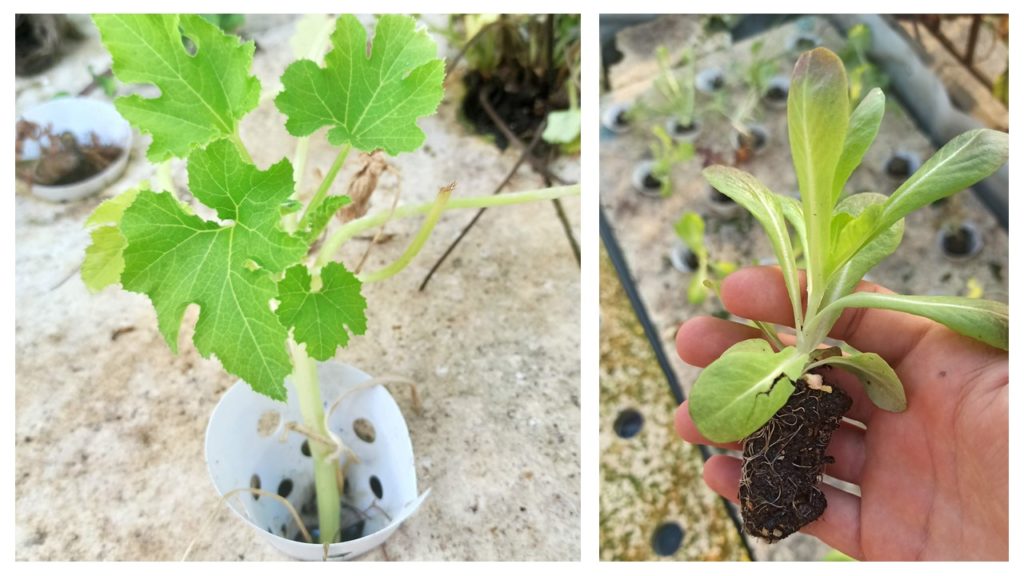
- A white, firm, and full root ball, that holds the soil firmly (but is not yes degenerated and still has some room for more growth)
- A low, firm foliage, without any signs of light shortage (as detailed further on)
- Free of any pests and disease, such as aphids and fungi (be sure to check under the leaves!)
- Is at the peak of its growth, and hasn’t degenerated for too long in the tray
Seed anatomy
Spreading seeds is a safe and effective way for plants to spread themselves. They help plant species move to new places and skip hard seasons. They are a time capsule that can withstand a lot. All seeds contain a living, dormant plant (which is called the Embryo), along with some nutrients (usually Endosperm) that are kept for the first stages of germination. When we eat seeds (like corn and beans) we eat these nutrients.
These nutrients are the reason why you can make edible sprouts in the dark kitchen closet: at the first stage, the seed uses its nutrients and does not need any sunlight.
The germination stages
When you start your own seeds, there are four notable stages that you should pay attention to:
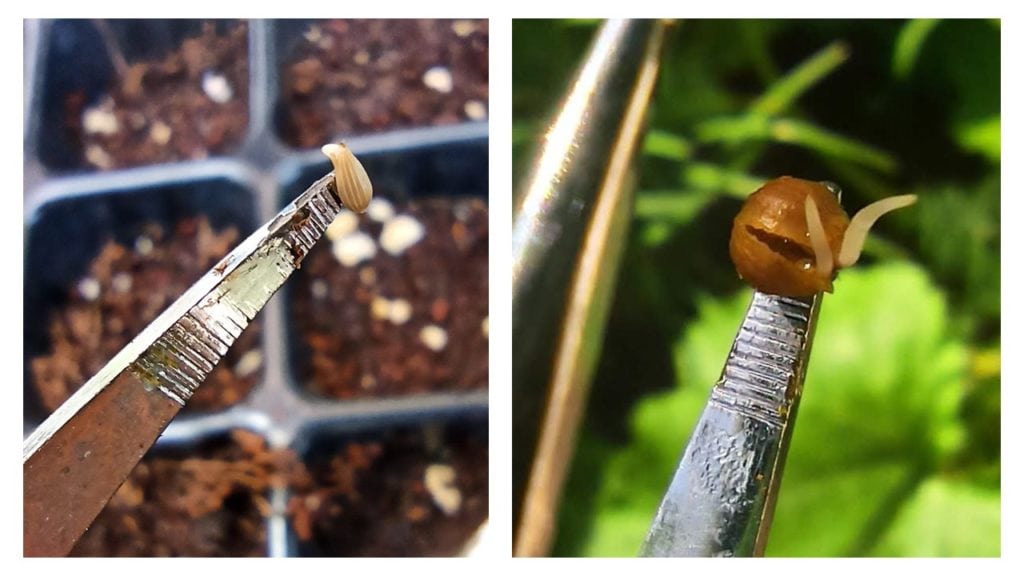
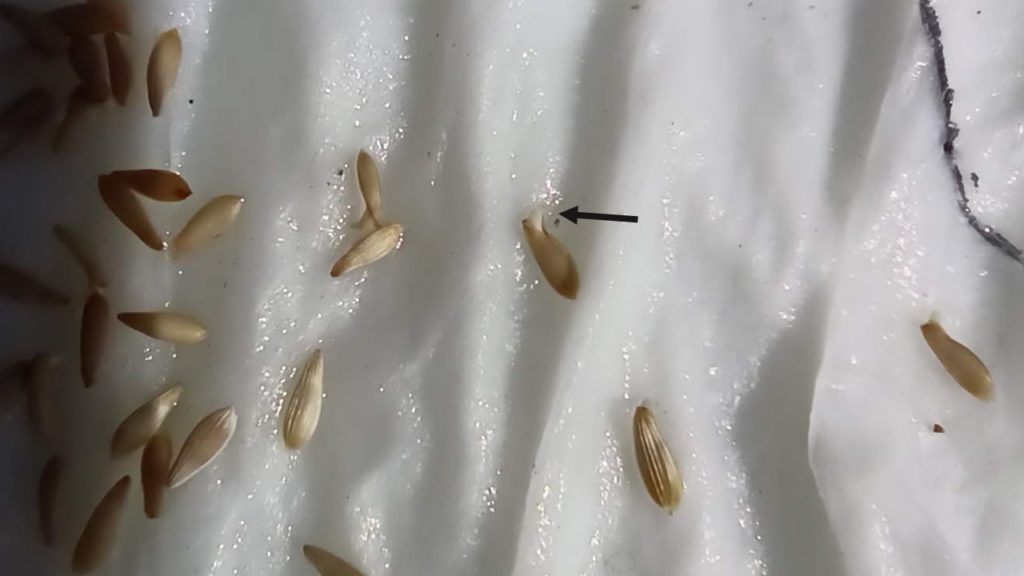
- Soaking: at the first couple of hours after the first irrigation, the seed soaks a lot of water and nearly doubles its size. Sometimes it also changes its color.
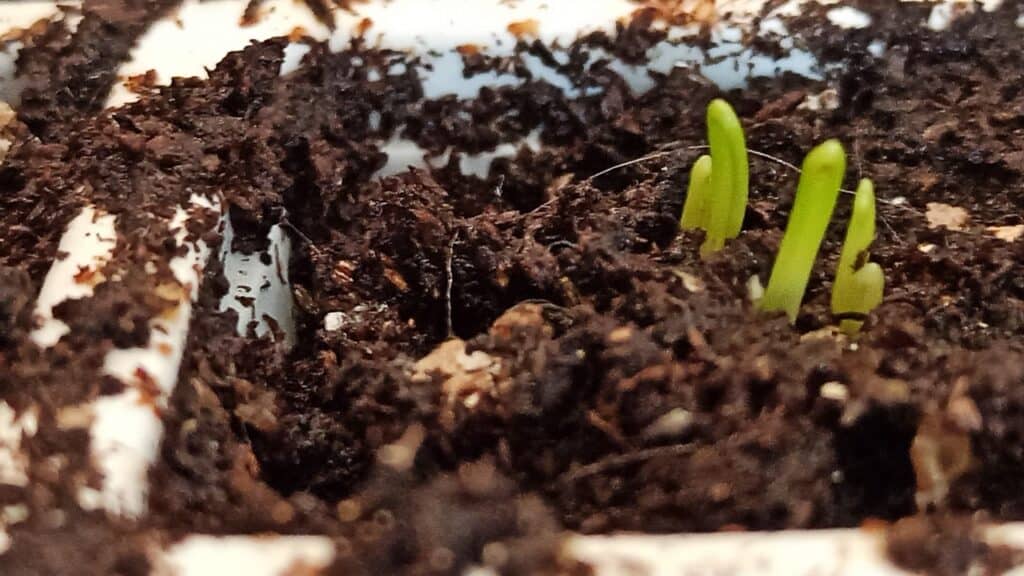
- Cracking: the seed shell has cracked open, and the growth has begun! The cracking indicates that the seed has decided to emerge. from this stage, there is no going back.
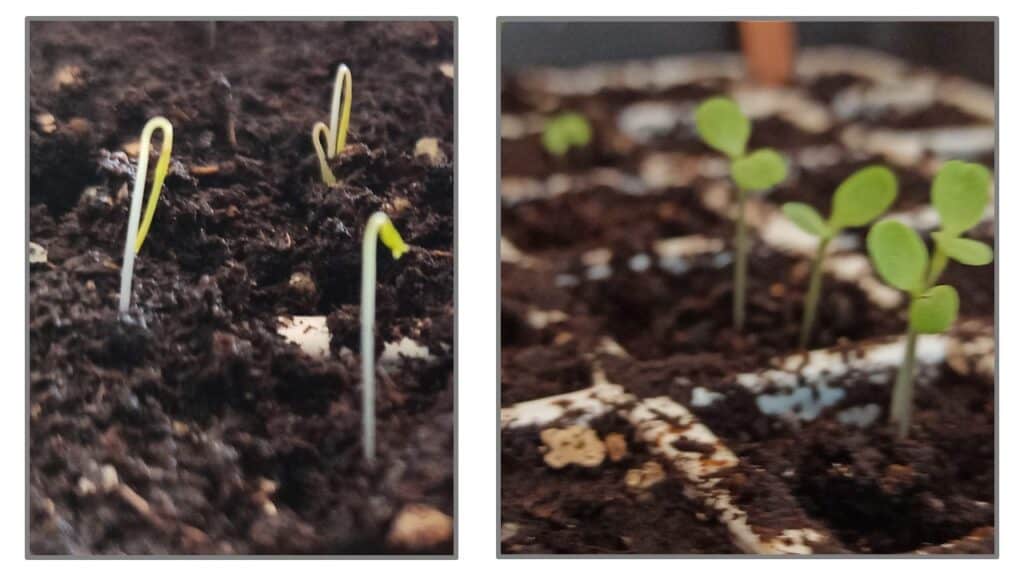
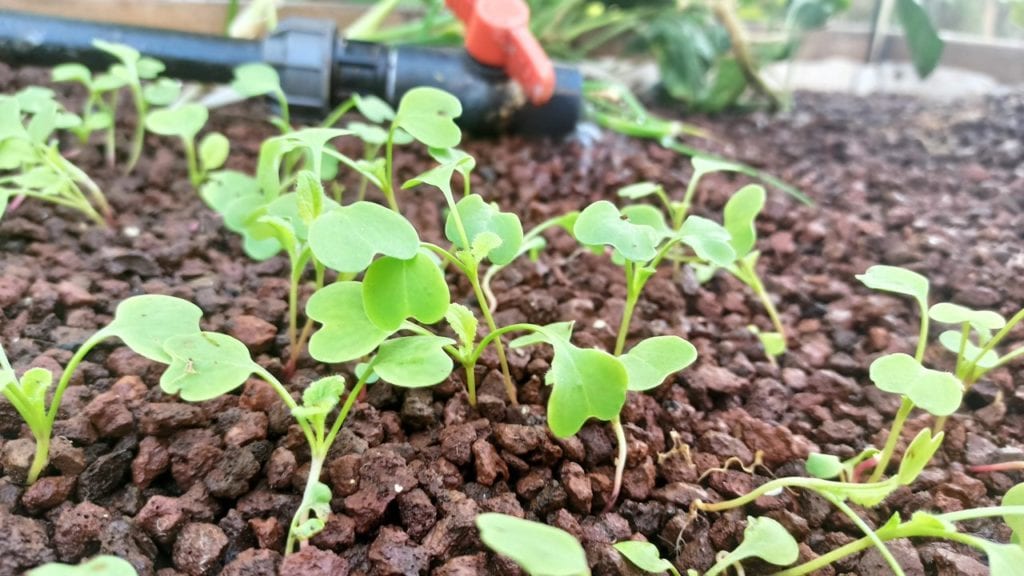
- Emergence of the first root and shoot: the root comes out first, anchoring the plant to the soil. Right after comes the first leave(s), called cotyledons. They provide sugars and nutrients through photosynthesis. At this stage, the plant is no longer dependent on its reserves.
- Emergence of the true leaves: as the plant grows more leaves, it starts consuming more and more nutrients from the soil. You can start to apply fertilizer and lower the irrigation frequency, making the roots grow stronger.
To sum up, a seed is a dormant plant waiting patiently for the right conditions to emerge. As growers, It is our responsibility to provide these conditions for each of the germination stages.
Matching the environment to the plant’s needs
For good germination, It is important to provide the seeds with the right environmental conditions. The main aspects are:
Soil
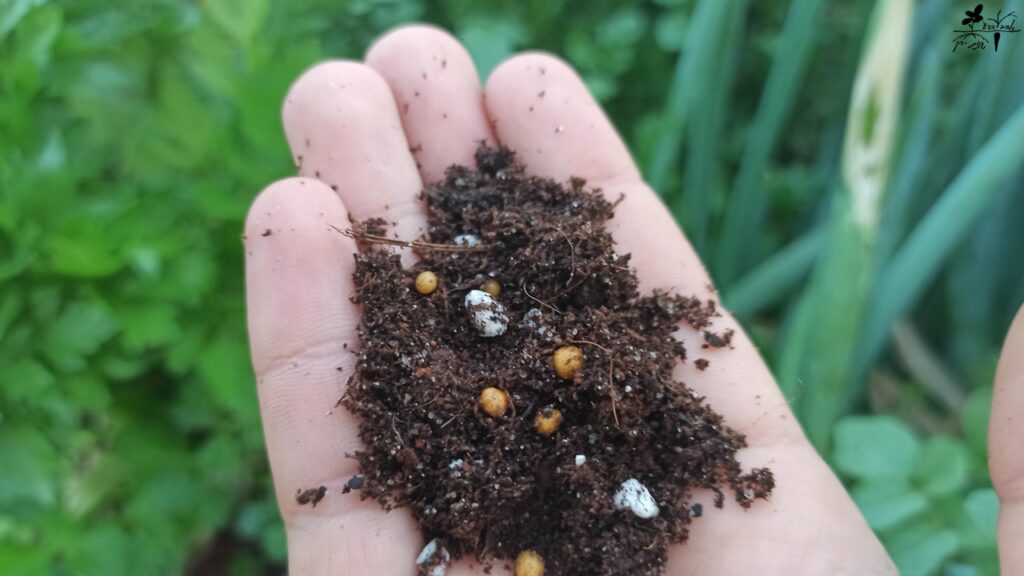
A good propagation substrate is an airy mix capable of holding both moisture and air. It is sterile and does not contain any large grits or particles that might get in the way of the emerging seedling.
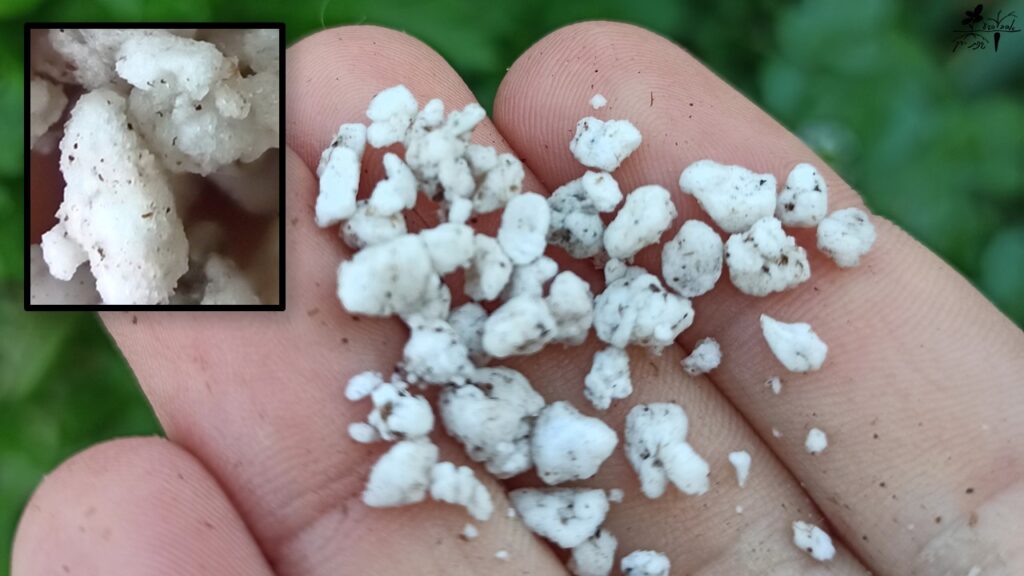
Use a new peat moss potting mix. You can add perlite additive to the substrate, which will make it light and airy. I like to fertilize my substrate with organic worm compost at a 1:10 ratio. But you can also fertilize through irrigation (fertilize sparingly, as young plants do not need much fertilization). Be sure to check if the substrate you bought already contains any fertilizer additives.
Do not use garden soil or any used substrate! Unsterile soil might come with its old pathogens nutrient deficiencies. It can make or break your success.
Seedling tray
A lot of gardeners (me included) tend to turn any old container into a flowerpot. If you search online you will find many suggestions for turning old yogurt cups or egg trays into seed starting pots. However, seedlings are way more delicate than mature plants. you should provide them with the best conditions you possibly can. That is why I suggest you avoid recycled containers and use a dedicated seedling tray.
Seedling trays (sometimes called plug trays or propagation trays) are plastic trays containing many pockets for sowing. All pockets are of the same size and depth, and they make everything more uniform. This uniformity allows you to learn from your mistakes and get better with each season.
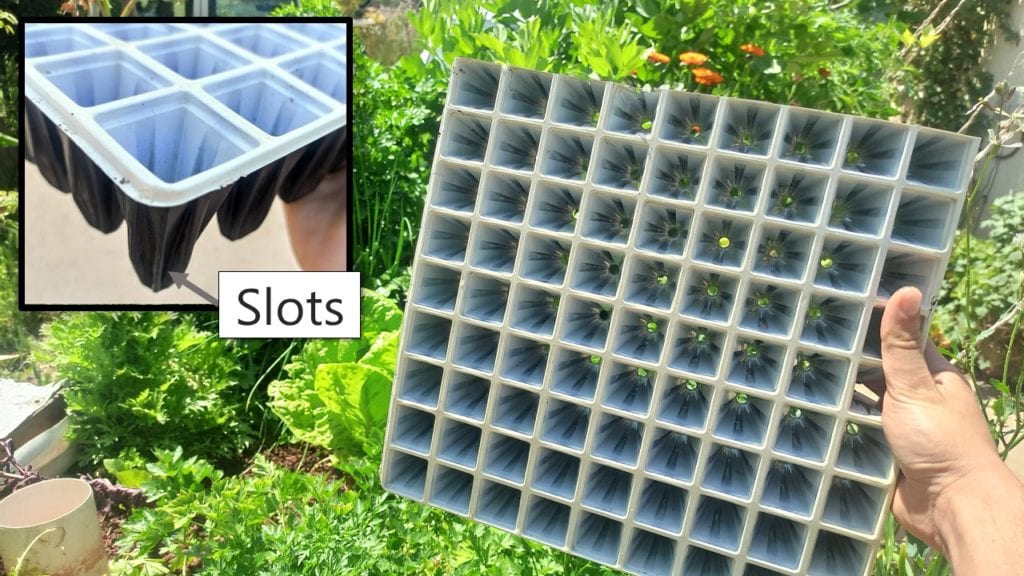
A seedling tray allows you to start many seeds in a tight space, making sure that even if some of the seedlings do not come out as planned, you will still have plenty of good ones for use in your garden (never use a defected, sick or dwarfed seedling).
you can usually find used seedling trays in nurseries (just ask the seller) or thrown on the side of fields in rural areas. You can also buy new trays on amazon and in garden supply stores.
It is important to sanitize your seedling tray before each cycle: plant pathogens can accumulate and stay dormant for many months, waiting for your young seedlings. You can use hydrogen peroxide, or just dip the tray in a diluted bleach solution, and wash it afterward.
Irrigation
Moisture plays a big factor in seed starting. Seeds need water to germinate, but also need air and dryness to harden and grow. You should fit your irrigation regime to the germination stage:
- Right after sowing: the seeds should be soaked wet. Avoid flushing the gentle seeds by irrigating with a light mist, or just put the seedling tray in a watertight plastic tray filled with water
- When the first root emerges: the root needs both water and oxygen. keep the plant well irrigated, but let the water drain between each irrigation, allowing fresh air to penetrate the substrate
- When the second set of leaves emerges: as the seedling grows, the time between each watering should also grow. Allowing the seedling to experience a bit of drought will encourage it to grow vigorous roots that will hold tight to the substrate, allowing for easier transplanting later on. (never let the substrate run fully dry, as it will harm or even kill the plant)
Lighting
Plants need sunlight for photosynthesis and growth. If a seed sprout and is not exposed to sufficient light, it will start stretching and elongating in a desperate attempt to reach any light source. This elongation is called Etiolation, and you should avoid it: etiolated plants are usually too weak for transplanting. Etiolation is also irreversible: if your seedlings grew long and skinny, they are no good.
This is why you should grow your seedlings under direct sunlight or a dedicated grow light, and never in the shade. Once the seed has cracked open and germination started, it should be well lit.
Light also plays a role in the first stage of germination: most seeds prefer to be in shadow for germination, simulating being buried in the soil. But some seeds (such as lettuce) prefer light for germination.
Temperture
So a seed is a dormant plant, waiting for the right conditions. All seeds have a maximum and minimum germination temperature, outside of it they will not germinate.
Note that the temperature is mostly important for the first stage of germination: once the seed has cracked open there is no going back- it will grow even if the temperature changes a little.
In general, the best germination temperature for vegetables is around 24°C (75°F), reaching 30°C (86°F) at max and 10°C (50°F) at min. Therefore, it is a good practice to put the seedling tray in a cozy room indoors for the first few days after sowing, where the temperature is stable. Just remember to move the tray to a lit place as soon as germination has begun.
Another way of dealing with unstable/bad temperatures is to use primed seeds: these are seeds that were treated for easier germination. Usually by sprouting them for a few hours, breaking dormancy, and then quickly drying the up again, keeping them for later. just note that primed seeds have a shorter shelf life, and usually are a bit more pricey.
What plants should you sow?
Timing
I live In a Mediterranean climate, and we have here two growing seasons: in summer we grow larger, fruiting plants such as tomatoes, cucurbits, beans, etc. In winter we grow leafy greens (such as lettuce, celery, parsley) and brassicas (such as cabbage, kale, cauliflower), which usually prefer colder temperatures.
Each plant has a different sowing time, that varies according to the climate in your area: Choose your seeds accordingly. I recommended you buy seeds at a local store or nursery (and not online) or get them from a local grower. this way you get varieties that fit your climate better. Also, the right sowing time will usually be written on the package, so no need to guess here.
Plants that you shouldn’t sow in a seed tray
Sowing in a seed tray is not always the best option. Some plants should be sown directly in the soil, while others should be propagated or copied directly from a mother plant. Here is a partial list:
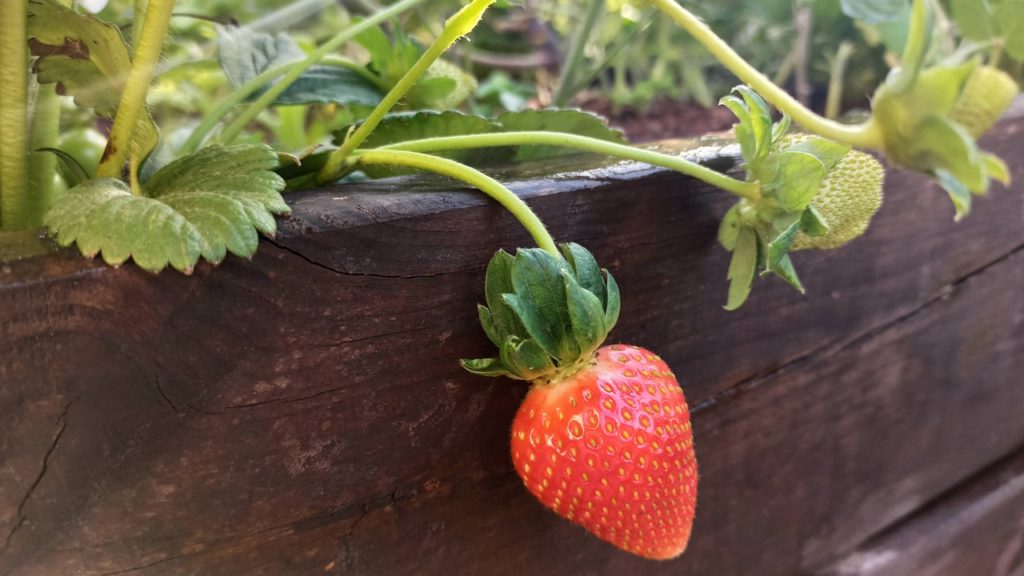
- Strawberries: can be multiplied from vegetative runners, sent by a mother plant.
- Sweet potatoes: can be rooted easily: put a store-bought sweet potato in a water jar and let it send shoots. Then cut and root those runners in water or potting mix
- Potatoes: can be grown from other potatoes. Plant one small potato, get a bunch of potatoes
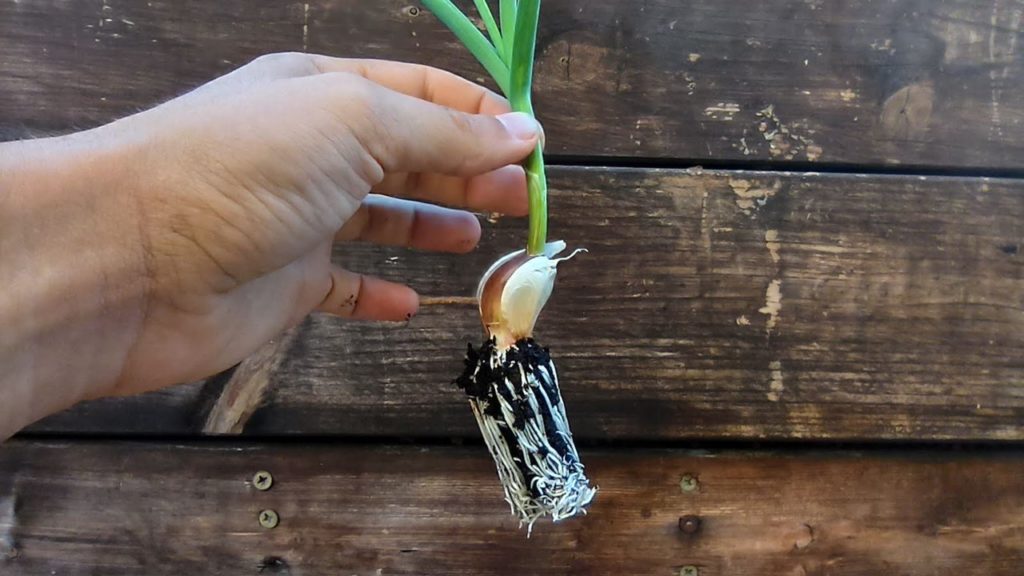
- Garlic: just plant one garlic clove, and get a garlic head at the end of the season
- Carrots, radishes: should be sown directly in the soil, as it is hard to move them once they germinated
Germination time
Different vegetables have different germination times.
For example, in my area, kale seeds will crack open after 3-4 days, while celery can take up to 2 weeks (!).
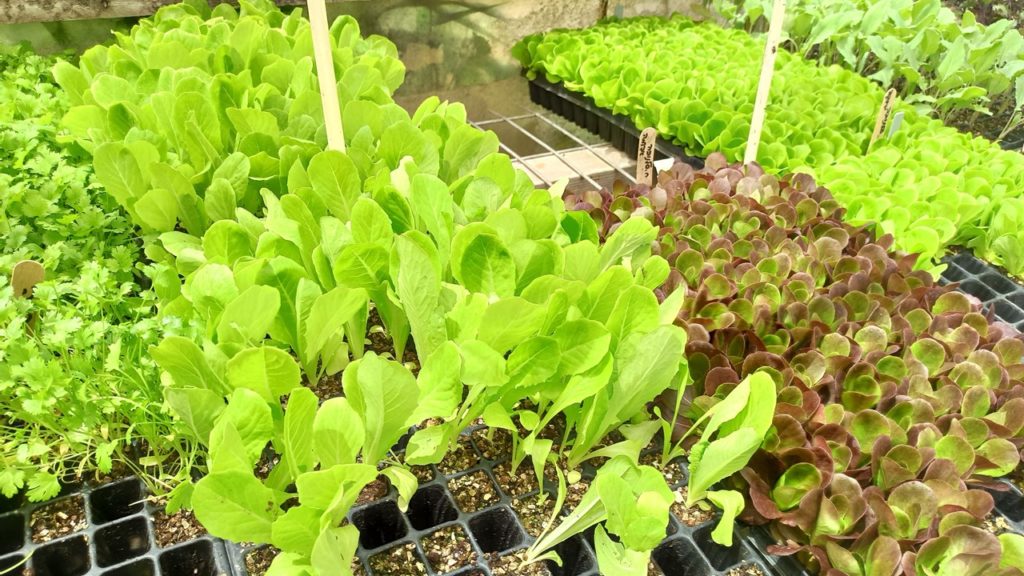
If you are a home grower you probably don’t need a whole propagation tray of just one plant, and you will mix different plants in the same tray.
The thing is, if you mix seeds with different germination times in one seedling tray you can end up with mature plants next to very young and delicate plants, giving you a hard time deciding how to treat the tray: should you move it outside to harden the mature seedling? Or should you keep it inside to protect the young ones?
If you intend to sow different plants in the same tray, match together plants with long propagation time: celery, parsley, peppers, asparagus, and chives take their time in my climate. As you gain experience you will know what goes with what.
Another option is to cut your seedling tray into two or three: use sharp scissors prior to sowing, and sow just one variety in each smaller tray.
Aging of seeds
All seeds have a shelf life. As I mentioned before, seeds are living, dormant plants. Being dormant (“asleep”) means that they still consume a tiny bit of energy to stay alive. If we wait for too long this energy will run out, and the seeds will die. Some seeds die after just a couple of months, while others can stay for hundreds of years.
Most vegetable seeds die within the first 1-5 years, depending on the plant. You should keep your seeds in a dry, cold place. If you have some old seeds and you are unsure of their viability, just put 5-10 seeds on a wet paper towel, and see if they sprout.
Additional tips
Avoid gimmicks
Nowadays you can find online a ton of different patents declared to make your seedling starting process much easier/faster/better, or anything that will convince you to buy.
In my opinion, you can usually give up these:
- ready-made plugs like jiffy or oasis plugs (most plants will do great with good quality potting mix)
- plastic support-things for seedlings (the stem should really be strong enough to support the plant)
- propagators and heating mats (unless you live in a cold climate)
In fact, no merchandise can fix an expired seed, a lack of lighting, or a bad irrigation regime. And on the other hand, if you can give your seedlings the right environmental conditions you really don’t need any other product. If you consider purchasing any complementary product, buy only if you have already encountered the problem that it solves.
Hydroponic seedlings
New hydroponic growers tend to look for hydroponic seedlings, specially made for hydroponics.
Although seedlings can be grown hydroponically, the truth is that you can use normal seedlings for hydroponics, with great success.
The secret is to use a young seedling (starter plugs). At this stage, the root system is developing rapidly and will adapt itself easily to the wet conditions of hydroponics. This is why commercial hydroponic farmers use normal starter seedlings.
Another concern that bothers hydroponic growers is the growing mix that comes attached to the root ball. Once again if you use small starter plugs the amount of soil entering your system will be negligible and will not clog your pump or piping.
Growth speed
One of the most overlooked symptoms is slow growth. Your seedlings appear to be lively and green, but they are in fact stuck at the same size for days. There are many causes for decreased growth: too high or too low temperatures, nutrient deficiency, improper lighting, overwatering, and more.
The important thing is that you check the growth rate of your seedlings: take a photo every few days. If they look the same as in the last photo, there may be a problem. The bonus is that you get this way amazing photos of your seedling’s growth.
Automatic seed-starting system
For the finale, I like to show you my hydroponic system for seed starting. It waters the seedlings automatically and without wetting the leaves. It is also possible to fertilize the irrigation water for better results.