How to build a hydroponic system
Introduction and basis
The process of setting up a hydroponic system is fun and exciting – this is a system that will accompany you for years and yield a lot of produce. Hydroponic systems are characterized by a large initial investment, and minimal maintenance later on. In order to reduce the initial expenditure, you can build a hydroponic system using the do-it-yourself method – in which case it is very important to invest time in the preliminary planning of the system on all its sides. Proper planning will prevent surprises and unnecessary expenses later, and will allow you to enjoy fresh vegetables that you grew yourself, in the hydroponic system that you built yourself.
Location selection
The specific location where you will grow the vegetables has a decisive effect on the success of the cultivation. In fact, the topic is so important that I dedicated a separate article to it. In short, the following criteria should be observed:
- Lighting :Growing vegetables requires at least 5 hours of direct sunlight per day. You can check the amount of sunlight in your area using the Sun Path app.
- Accessibility: Occasional picking, diagnosing problems at an early stage and ongoing care require easy access to the system.
- Electricity and water: A hydroponic system requires a nearby connection to electricity and water. If there are no different solutions, I have expanded on them in the attached article .
- Space to expand to later: if you want to increase the system and get more produce.
The growing method
There are endless methods and techniques for hydroponic growing. But the 3 main methods are:
- Pipes (NFT) :Growth in PVC pipes. The method allows growing a variety of plants in a limited area, and is suitable for walls and balconies.
- Floating Rafts (DWC): Growth in Styrofoam rafts floating on the surface of a water bath. The method allows less maintenance and low cost.
- Tuff (Flood and Drain): growth in a tuff or a hydroton bath that is filled and emptied with water alternately. The method makes it possible to grow any plant (including root crops) with extremely high success rates.
Each of the methods has its own advantages and disadvantages, we suggest you go to the article on breeding methods to choose the method that suits you.
System size
The size of the system should be as the size of your appetite. Under optimal conditions and as a rule of thumb, each planting hole will yield one head of lettuce per month (or other leafy vegetable of the same size), or about three cucumbers per month (or other fruit of the same size). That’s why I recommend having a hydroponic system with at least 15 planting holes per person. For example – for a family of 4 I would recommend a system with at least 60 planting holes. This refers to planting holes at intervals of 20 cm from each other.
In addition, the type of system must be adapted to the type of growth:
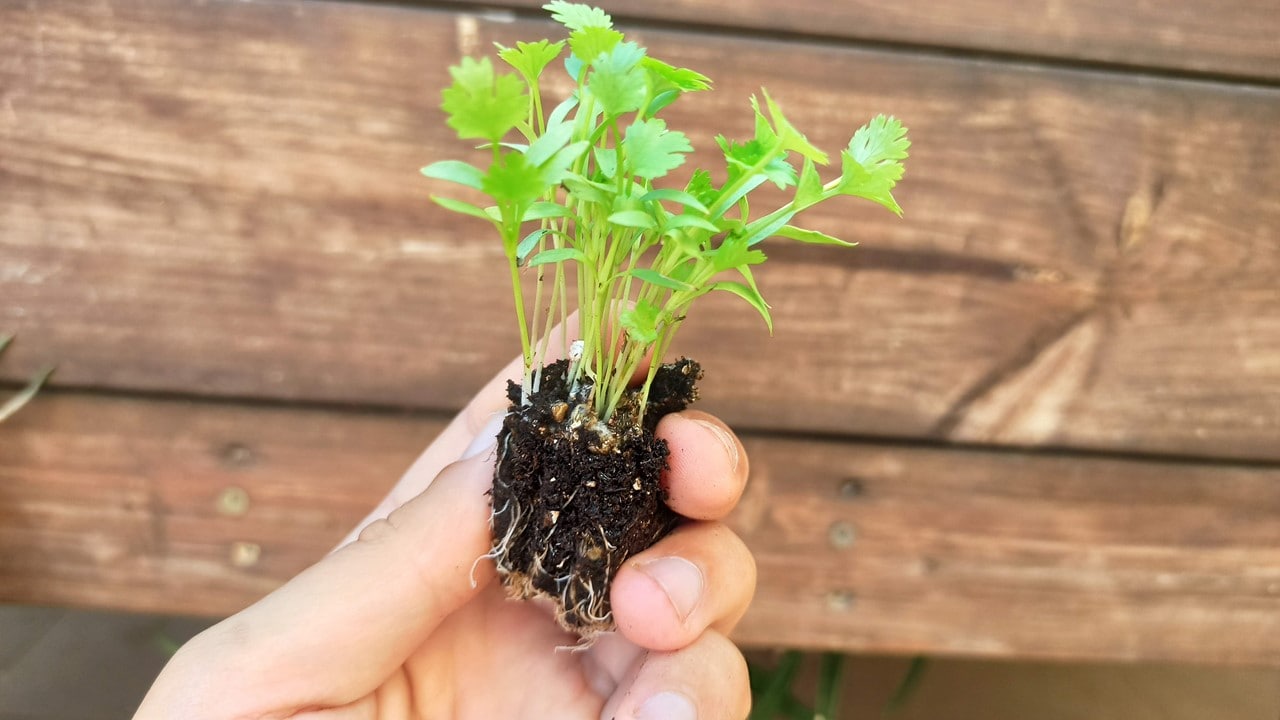
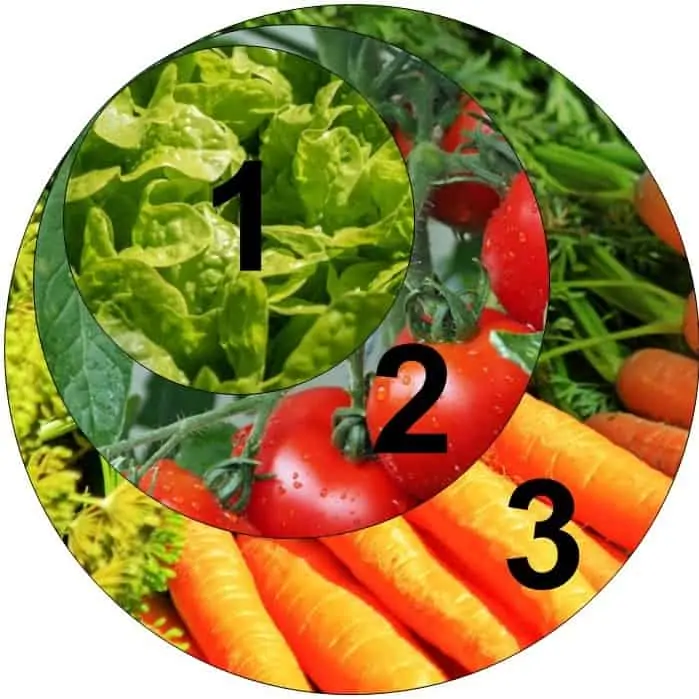
Group 1: These are the leafy crops, they have a small root system and are quick to grow and harvest: lettuce of all kinds, parsley, cilantro, celery, chard, beetroot, scallion, kale, basil, bakchoi, tat-sui, Osaka, chicory, Mizuna, green onion, kohlrabi, dill, fennel. These plants will be satisfied with a passive hydroponics system (kartaki), floating rafts and also a tube system (NFT) with a diameter of 75 mm
Group 2: Fruiting plants. These are larger plants, which usually take two to four months to bear fruit: tomato, cherry tomato, eggplant, pepper, cucumber, pumpkin, gourd, zucchini, strawberry, corn, melon, beans, ornamental flowers. These plants will grow happily alongside group 1 plants, but will require a system that can accommodate their roots: a 110mm NFT system will do, or a deep water system (DWC).
Group 3: root crops and plants with a particularly large and aggressive root system: okra, hibiscus, salvia, carrot, potato, sweet potato. These plants will happily grow alongside leaf crops and fruiting plants (groups 1 and 2), but will require a particularly deep system to contain their roots: systems of emptying and overflowing (tuff), Dutch buckets, and a system of pipes (NFT) with a diameter of 160 mm.
Please note – plants from a lower group (like lettuce) can be grown in a system suitable for plants from a higher group (like DWC), but not the other way around.
Trailing
There are climbing plants that need a bamboo pole, a wire or a fence to climb on. With no space to trail on the plant will spread on the floor and may get pests and diseases. The following crops require trailing: cucumber, cherry tomato, beans (except bush beans), peas.
Another option is to plant at a high point in the system, and let the leaves fall down while hanging in the air.
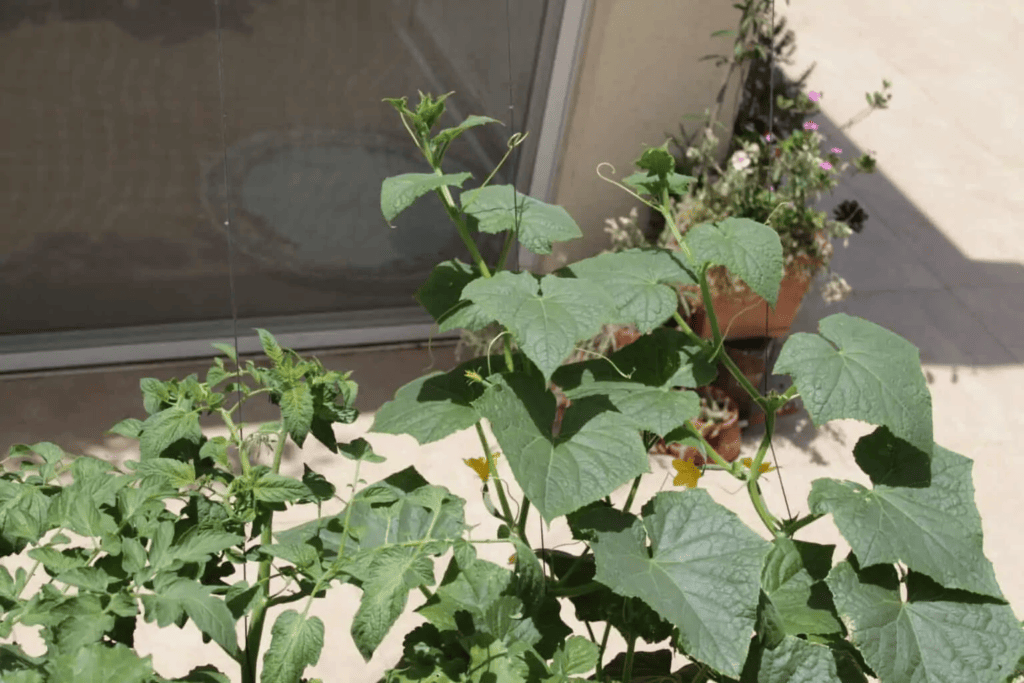
Trailing in cucumber and tomato
Materials and toxins
There are raw materials that may release toxins into the water, and from there they may reach the plant and your plate. Unfortunately, there is little research and information regarding home hydroponics, and most opinions are based more on speculation than real research. However, it has already been proven that toxins can reach from the soil/water, through the vegetables and into our bodies – so my recommendation is to make sure that any material that comes in contact with the growing solution is safe to use. If the raw material is intended for use with food or for agriculture – excellent. If not, exercise discretion and pay attention to the following materials:
- Decking: PVC sheets (like Intex) for swimming pools are considered safe to use. On the other hand, EPDM sheets for lining ornamental pools may release toxins and it is not recommended to use them.
- PVC pipes: PVC pipes in their normal form are intended to be buried underground as sewer pipes, and when exposed to UV radiation (like in sunrays), they disintegrate right into your growing solution. Use UPVC pipes that are resistant to UV radiation.
- Buckets: use buckets from the food industry such as used Tahini or Mayonnaise buckets (you can try and ask for it in fast-food centers). Do not use paint buckets! They contain paint residues and other chemicals that you don’t want in your salad.
- Tubs and bathtubs from the construction industry: mostly made of HDPE, acronym for High-Density Polyethylene. Although HDPE is safe to use (from which drink bottles and food packaging are also made), products made for the building industry may contain the addition of stabilizers, polymerizes, synthetic oils and other additives that cheapen production but make the whole thing toxic. Bottom line- almost anything you get from a construction shop is highly unrecommended as a gardening material.
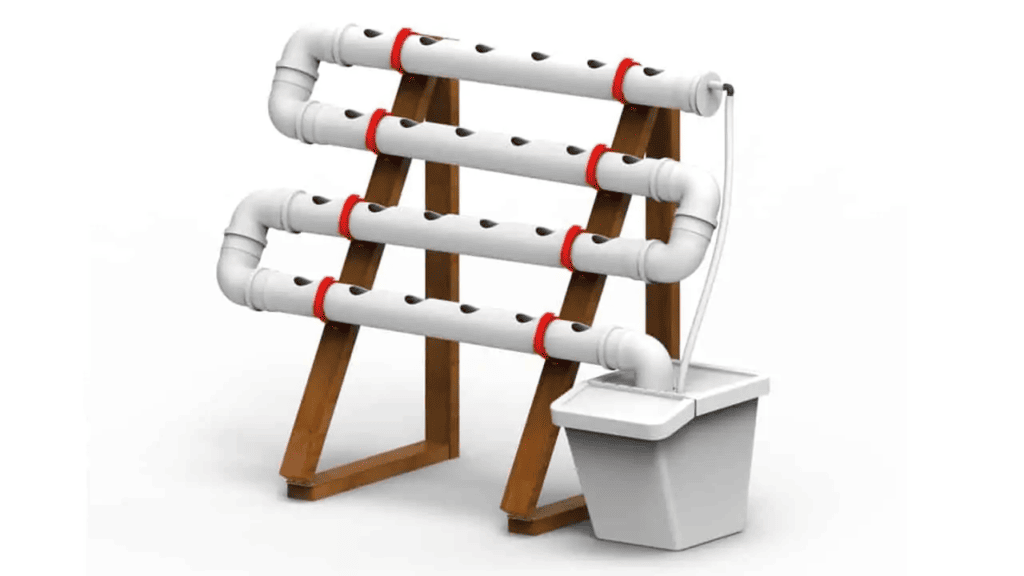
How to design and build an NFT hydroponic system (pipes)
The previous article dealt with the basic principles of designing a hydroponic system. In this article we will focus on the NFT method – a vertical growing method that uses PVC pipes. This system allows you to grow a wide variety of vegetables in a limited area, and it’s especially suitable for balconies. This article is a continuation of the introductory article on designing a hydroponic system.
Pipes
The main advantage of NFT is the ability to grow on walls, and that’s the reason why this method is so popular world-wide.
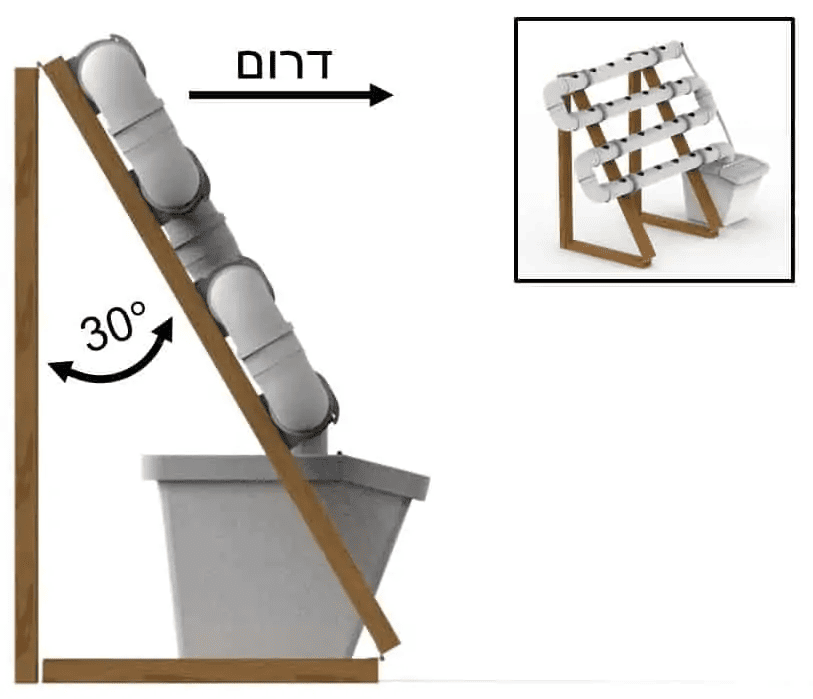
- Maximum pipes height: The height is set the way that fits you most. Remember- you don’t want your plants to grow out of reach, and for most people the height limit for the pipes is 1.9 meter (6.2 feet).
- Minimum pipes height: It’s the height of the water reservoir that determines the height of the lower floor, since the water must flow back to the water reservoir.
- Distance between the floors: You need to keep in mind that the plants will need vertical space to grow. In a completely vertical system, it is advisable to add a straight, short pipe and separate the levels 35-45 cm apart from each other, depending on the type of vegetation you want to grow. If the system is tilted towards the sun (as described later in this article), you don’t half to put the short pipe, nor set the levels far from each other.
Because of these limitations, most NFT systems consist of 1-6 levels.
PVC pipes diameter
The diameter of a PVC pipe determines the type of plants you can grow in the system. A diameter too small may cause root blockage- a situation in which the roots grow excessively and block the pipe. On the other hand, a pipe diameter that is too large will be more expensive with no gain. In the market you can find three common pipe diameters: 75 mm, 110 mm, and 160 mm. You’ll want to choose a diameter that fits the roots structure of your plants:
- 75 mm diameter: Leaf crops with a small root system and a growing period of no more than a month, such as: lettuce of small varieties, parsley, cilantro, beetroot, dwarf kale, bakchoi, tat-sui, Osaka, chicory, green onion, chives, garlic, leek, kohlrabi, dill.
- 100 mm diameter: Fruit plants and plants with a medium to large root system: tomato, cherry tomato, eggplant, pepper, cucumber, pumpkin, courgette, zucchini, strawberry, corn, melon, bean, fennel, mizuna, kale, Swiss chard, celery, broccoli, cauliflower, cabbage, Brussels sprouts, basil, lettuce of large varieties, ornamental flowers. In addition, all crops suitable for a 75 mm diameter can also be grown in a 100 mm diameter. This is the most common and recommended diameter – though you need to keep in mind that particularly large and thriving plants will need root pruning from time time.
- 160 mm diameter: Plants with a particularly large and aggressive root system: okra, hibiscus, salvia, sweet potato, and all crops suitable for 75 and 110 mm diameter. When planting in a 160 mm PVC tube, you need to use deep net cups filled with hydroton or tuff. If you want to give the young seedlings easy access to water you’ll need to put a fabric wick in the net cup.
Please note- small plants can be grown in a large tube, but not the other way around. For example – lettuce will grow happily in a 110 mm diameter tube, but a tomato won’t do very well in a 75 mm tube.
Gradients
Water flow that’s too slow may cause nutritional deficiencies in your plant and cause an accumulation of organic deposits in the tubes. The flow velocity is affected by the slope of the growth pipes, and it is customary to build a slope of 2% percent to each pipe. Meaning, for every 100 cm of pipe length, there should be a 2 cm height difference between the ends of the pipe. You can also grow on larger slopes or almost vertical ones, but try to avoid a 0% slope (=completely horizontal pipe).
Another gradient worth mentioning is the angle towards the sun. You don’t want the upper plants to shadow on the lower ones, therefore you’d like to lay the pipes at about 30 degrees away from a vertical state. With that being said, a vertical system would also work properly.
Planting holes
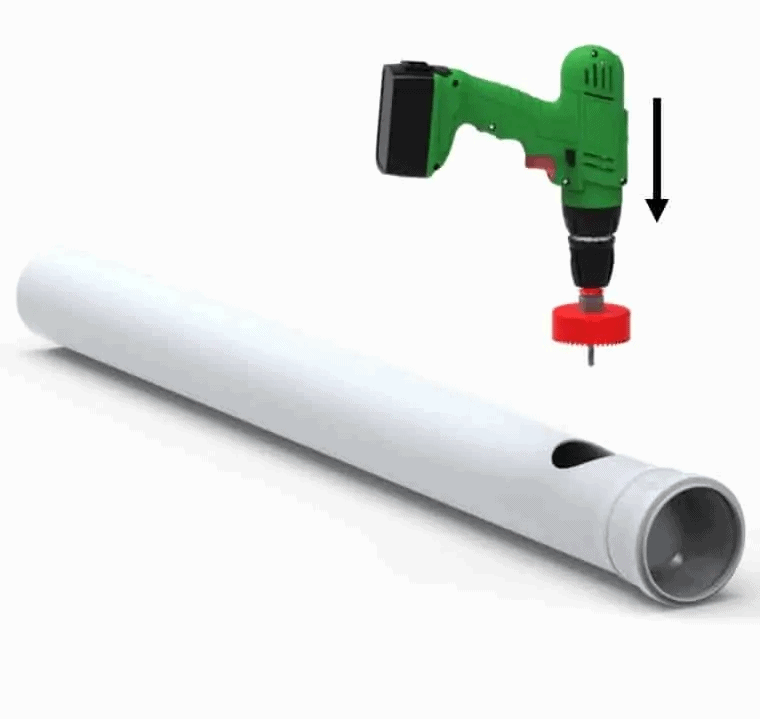
You can purchase growing tubes that come with drills for planting. If you already have a tube and you want to drill it yourself, you’ll need to use a cup drill:
- In 75 mm pipes: 2 inches bore every 10-15 cm.
- In 110 mm pipes: 3 inches bore every 20 cm.
- In 160 mm pipes: 4 inches bore every 25 cm.
These sizes are the accepted standard. You can vary the distances between the drills as you wish, but remember – denser bores will cause the plants to overshadow each other and slow down their growth-rate. If you live in an area with excess radiation and heat during the summer, such an effect may be desirable- but it’s always better to use a shade net as described below.
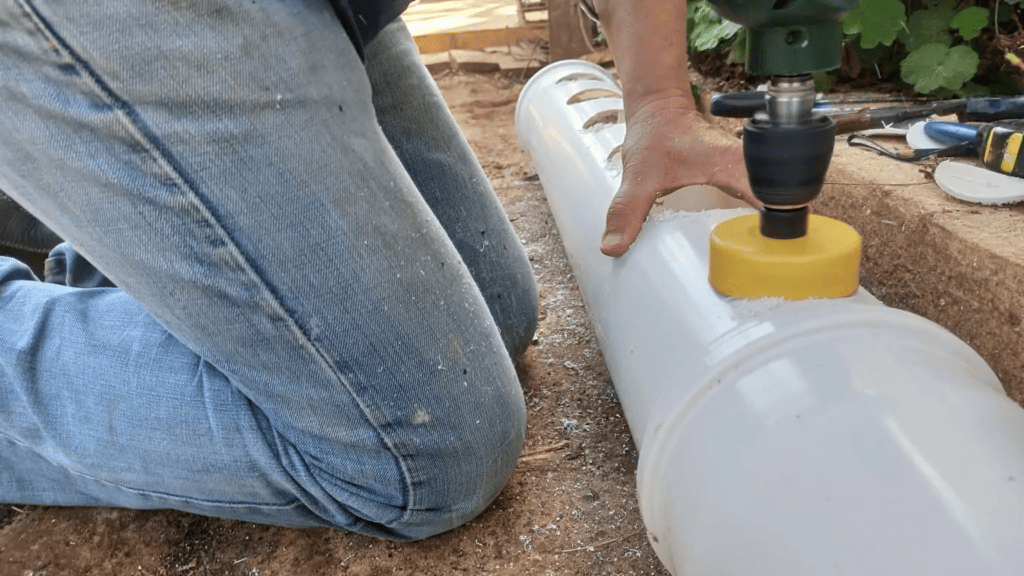
Drilling in a PVC pipe
Rubber Seal
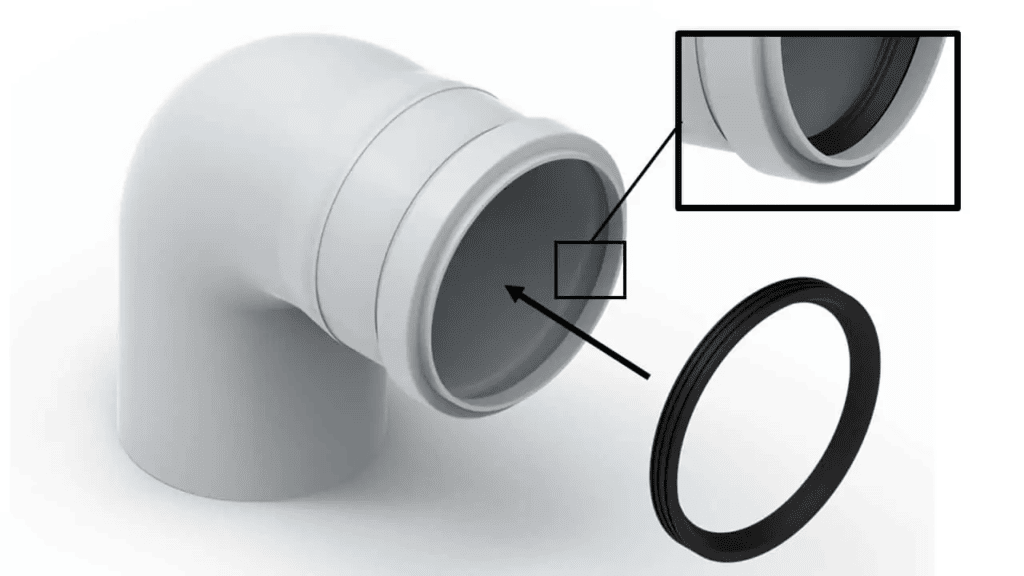
The rubber gasket seals the piping and hardens the connections in it. Be sure to insert the rubber seals with their face inwards.
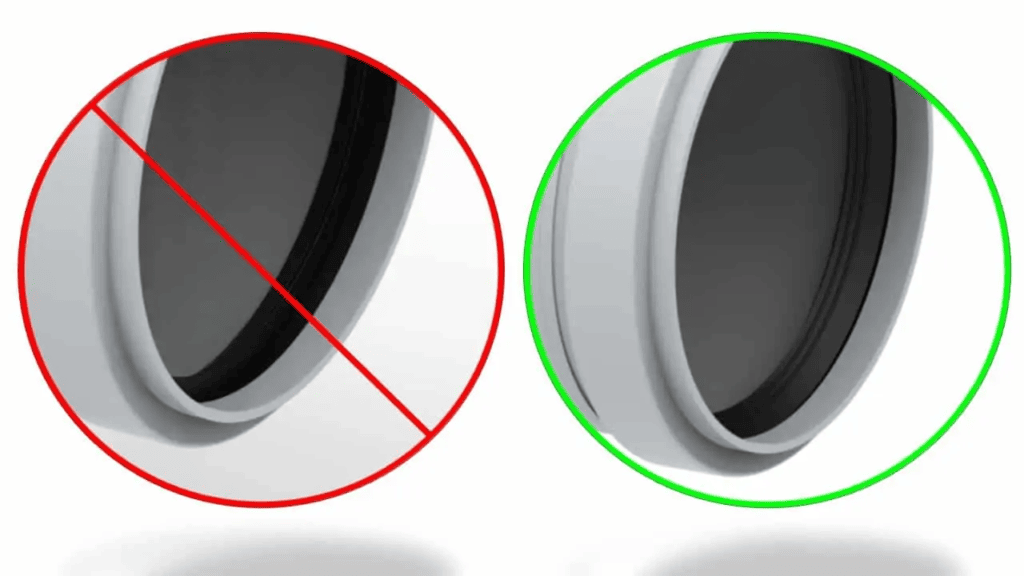
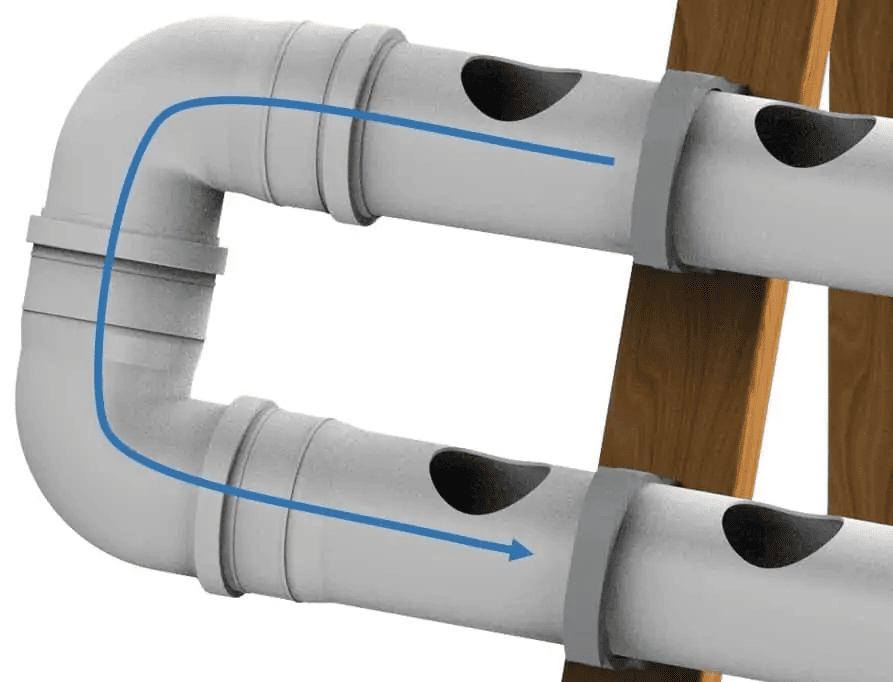
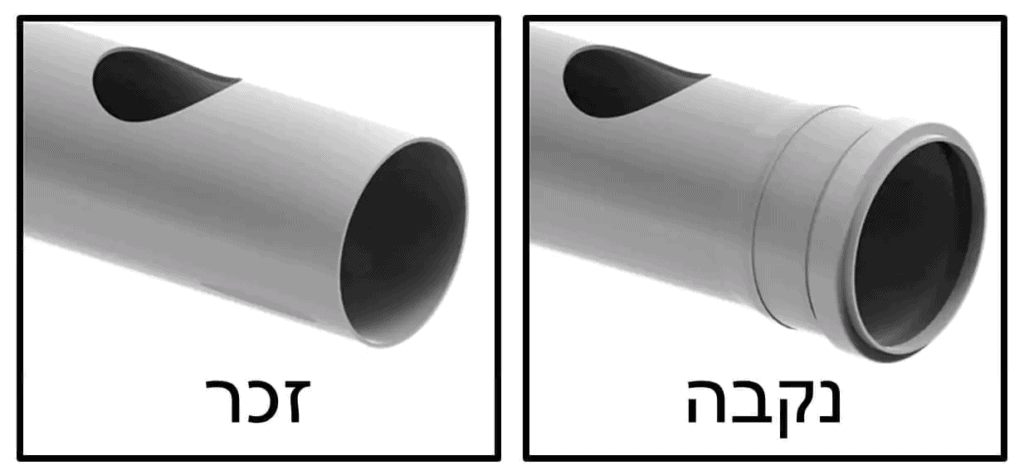
The pipes direction
PVC pipes have a preferred flow direction, and flow in the opposite direction may lead to leaks and sediments accumulation inside the pipe. When connecting the pipes, make sure that the water flows so that it leaves the male connector and enters the female connector as described in the figure.
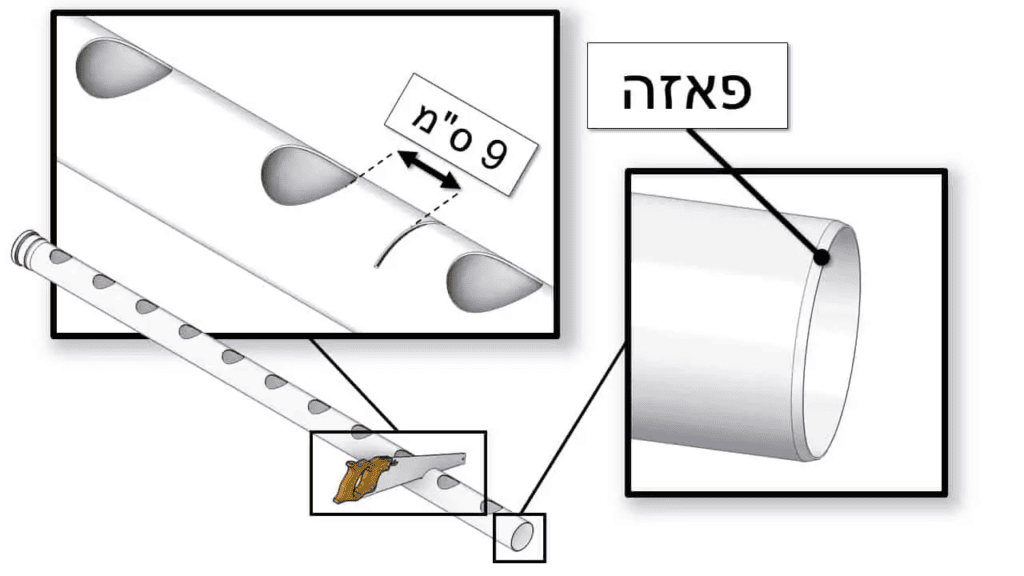
Shortening the pipes
PVC pipes are sold in different standard lengths. You can easily shorten their sizes with a hand-saw – but don’t forget to add a chamfer (angle) at the end of the pipe with a sandpaper, so you’d be able to connect it more easily later on. Additionally, when cutting pipes that already have a planting hole, you must leave a space between it to the edge of the pipe.
The pump
There are many types of water pumps available in the market. In home NFT systems, it is customary to use aquarium submersible pumps – these are relatively cheap pumps, which are laid inside the water reservoir and work on the principle of centrifugation. Here’s a video that demonstrates the operation principle of these pumps:
Pump flow
The size and model of the pump is chosen according to its capacity. Sometimes pumps are mistakenly measured by their electrical power (in Watts). This is a less reliable measure, because it does not consider the varying energy efficiency between pumps: a good pump will consume little electricity and still flow a lot of water. The water flow index of a pump is measured in liters/hour, and it refers to the water flow when the pump circulates the water at an altitude of zero. Of course, in practice the pipe must raise the water to a height of 1-2 meters, so the water flow in your system will always be lower than the water flow index written on your pump. There is also a difference in the actual flow between the Chinese pumps and pumps sold in Israel, even if the label shows the same index. For most NFT systems, a flow of about 1-2 liters of water per minute is sufficient. Choose a pump that provides this flow according to the height of the upper pipe in the system. If you are in doubt, it’s better to take a slightly stronger pump, and limit the flow with a plastic faucet if necessary.
Connecting the pump
The pipe that carries the water from the pump up to the PVC channel will be a regular dropper pipe with a diameter of 16 or 20 mm, and preferably white to reduce heating in the sun. The longer and higher the pipe, the harder it is for the pump to flow water through it. Therefore a wider pipe can improve the pump efficiency. We will connect the pipe with regular tooth connectors (of drippers) and we can add a simple plastic faucet to adjust the water flow.
Second pump
A water pump usually lasts about 4-7 years. If the pump breaks down on a hot summer day you have a few hours until all the plants in the system join it and die. That’s why some growers choose to have a second pump as a backup. In an emergency, you can open a garden hose on a thin stream and flow water through the growing pipes until a replacement pump is purchased or until the electricity is restored.
Frame
The PVC pipes can be connected to a wall, a railing, a chain hanging from above or a dedicated stand. The connection is made with the help of metallic omegas, fabric strips or plastic clips. Note that each pipe needs support at two points, and four-meter-long pipes – three points of support.
The volume of the water reservoir
The volume of the water reservoir determines the amount of maintenance you will need to invest in the hydroponic system. The more water you have in the system, the slower it goes out of balance. That is why it is worthwhile and profitable to invest in a large pool. The volume you will see in most NFT systems on the market is 60 liters, but there is no obstacle to building a larger water reservoir yourself. You get inspiration from the building instructions of the Hagai system. As a rule of thumb, the reservoir should have at least 1 liter of water for each planting hole in the system. (For example, for a system with 30 plants, a reservoir with a volume of 45 liters is recommended)
Shadowing
NFT systems tend to get very hot in the summer. The pipes, even if they’re white, function like solar panels – which heats up the growing solution and the plants suffer. The problem is so big that some growers add a bottle of ice to the water every day in the months of July – August. To get ahead of the blow, you can install a 30-50% shade net in advance, which you can deploy in the summer months, and even add a small fan to help the plants cool themselves. From the beams that hold the shade net, you can stretch the dahlia wires for climbing plants such as tomato, cucumber, and beans. For more on the subject, you can visit the article on dealing with high water temperature in hydroponics.
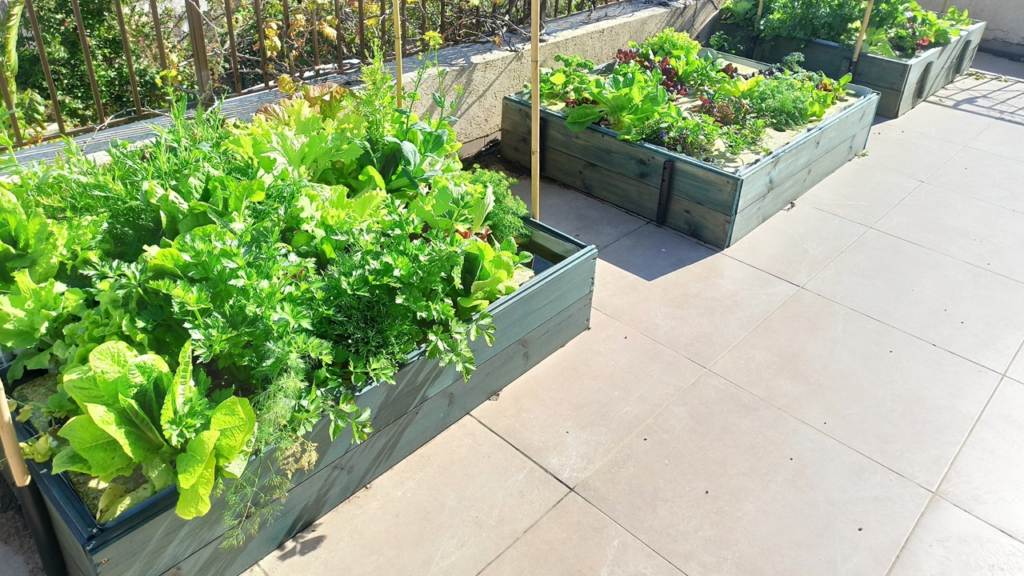
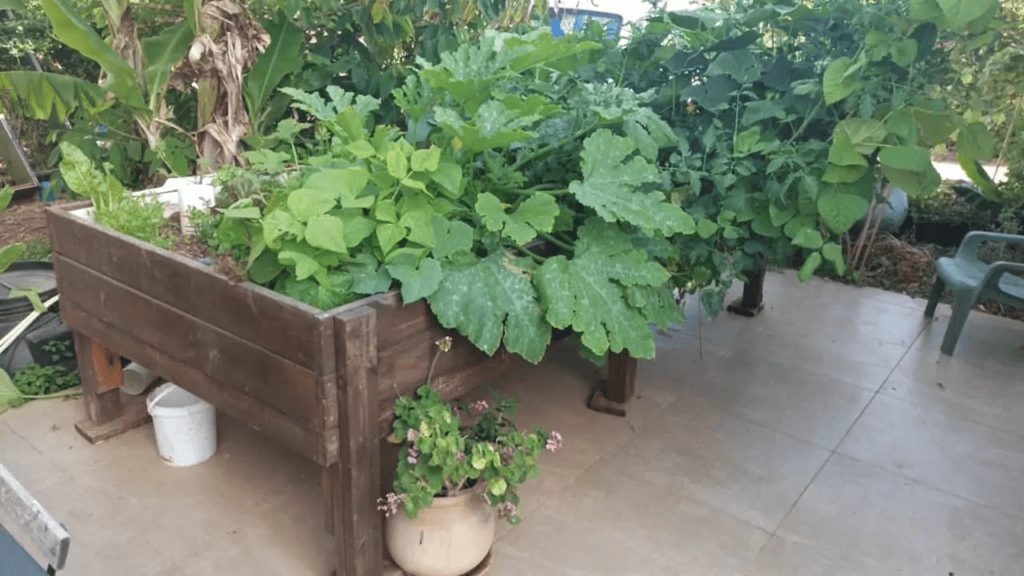
How to design and build a DWC hydroponic system (floating rafts)
For home growers, a floating raft system is a simple and easy-to-maintain solution, in which you can grow a large variety of vegetables without fear of root clogging.
The water reservoir
The recommended water depth is 20-30 cm. Such a depth allows plenty of space for the roots, reduce the frequency of maintenance, and ensures a good amount of water. You need a big volume of water in such a system, so that it will form a buffer for temperature, acidity and fertilization. However, I should note that I have already grown at depths of 3 cm, and there are commercial systems even at a depth of one meter – it’s all a matter of balancing the temperatures and fertilizers. You can use existing containers to create a simple system, or you can line the inner sides of a wooden frame. It is common to use agricultural containers and barrels (cut to length). Please note that the container you have chosen is safe for use with food and has not contained dangerous substances in the past.
Lining the wooden reservoir
You can build and line a wooden frame into a water reservoir. I’m a big fan of wooden stockpiles: they’re insulated, can be built to almost any size, and the end result is simply stunning compared to the plastic alternative. This is a fairly simple job, and the result is quite beautiful. You can get inspiration from the “Ronit” system.
After you have created a wooden frame, use a PVC sheet to line it. PVC sheets are strong and durable, and do not emit toxic substances into the water (unlike EPDM sheets). In this video I show how to wall such a reservoir with a sealing sheet:
Isolation
It is advisable to isolate the water reservoir as much as possible. Good insulation will block the arrival of solar radiation to the water, prevent the development of algae, and allow you to control the water temperature (but will not affect the temperature itself much). Isolate the water reservoir from the floor with a Styrofoam board, and you can wrap the sides of the reservoir with rock wool or other thermal insulation, with foil (or another material that reflects radiation) or build an aesthetic wooden frame around it. It is also worthwhile to plug unused planting holes with lids or empty planting cups.
Enter the construction instructions to learn how to build a Styrofoam raft that also actively cools the system.
Mosquitoes
Most hydroponic systems have constant water movement that prevents mosquitoes from developing in the water. However, in domestic DWC systems, the water stagnates, and mosquitoes may develop in it. There are excellent biological pest control products to prevent the development of mosquitoes in water. These preparations are based on the Israeli Bacillus (BTI): a bacterium that attacks mosquito larvae only, and is not dangerous to other organisms. In Israel, the preparation “Baktush” is most common, but you can also order Mosquito Dunk from amazon: a dry substance that slowly releases the BTI, and prevents mosquitoes for many weeks. Another option is to use Gambozia fish, which eat the mosquito larvae: although hydroponic fertilizer is considered toxic to fish, Gambusia fish survive it – for your consideration.
The Rafts
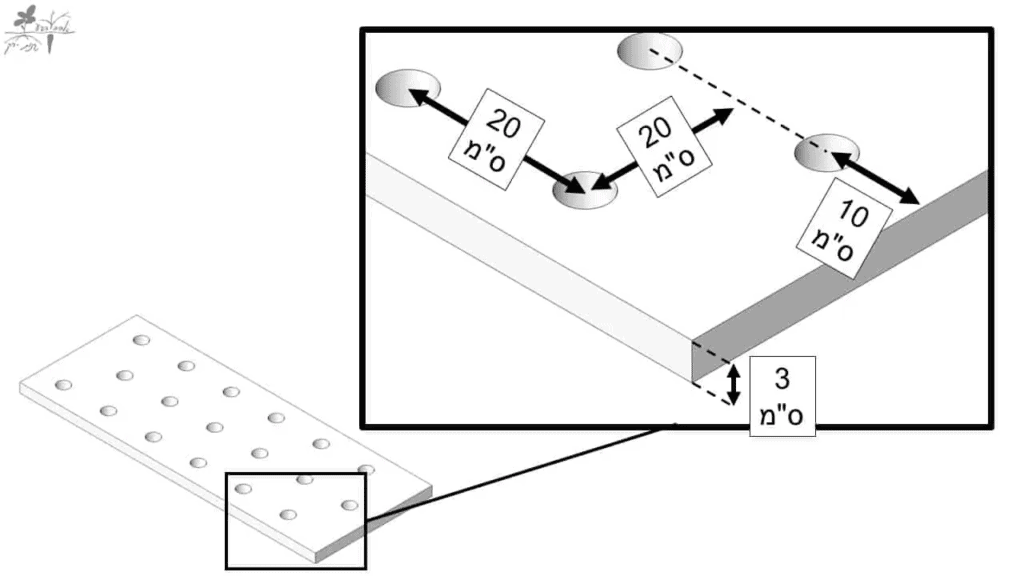
In the vast majority of DWC systems, they use Styrofoam rafts. It is advisable to use 3 cm thick boards, and a compressed Styrofoam. A thinner board will break easily when lifting and handling the system, while a thicker board will not allow the planting cup to touch the water. You can purchase raw Styrofoam boards in stores for building materials or creative materials, or buy drilled boards that are ready for planting in our store. It is advisable to use Styrofoam without flame retardant substances that may be released into the water and reach the plate. If you have access to expanded polyethylene sheets, you can use them instead of the Styrofoam and cut holes in them with a Japanese knife.
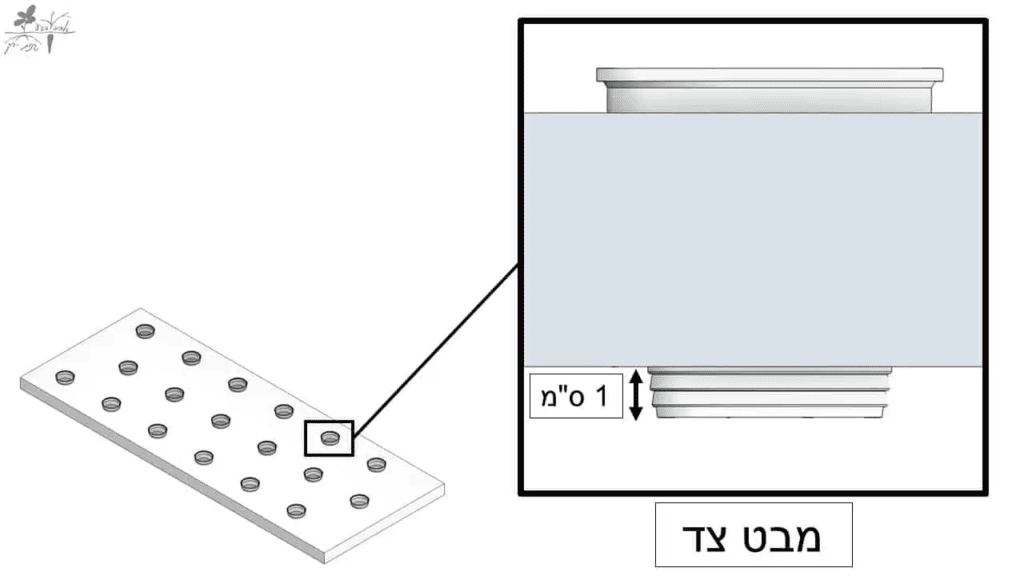
Drilling Planting Holes in Styrofoam
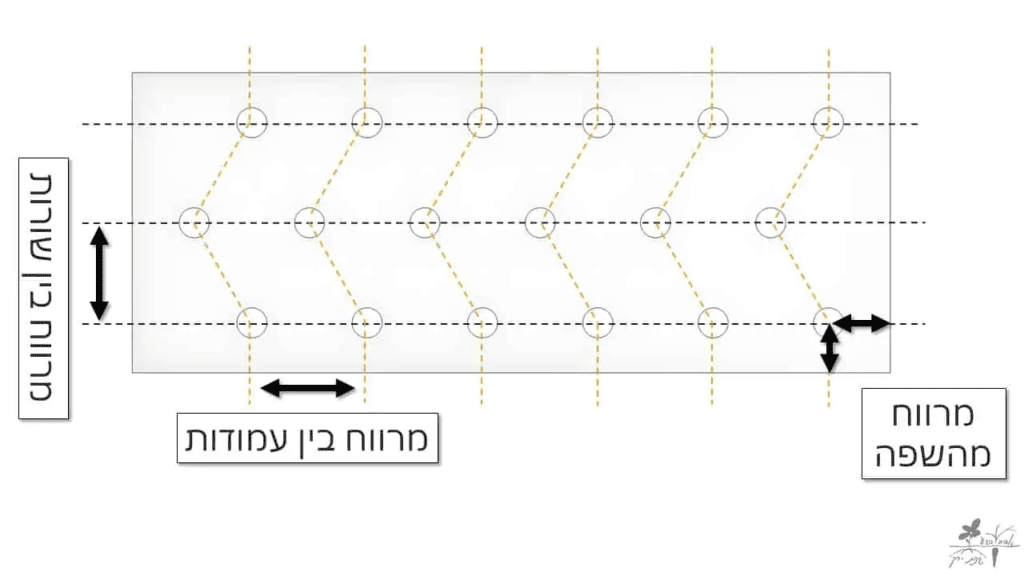
If you decide to make the grow rafts yourself, drill a 2-inch (~5 cm) diameter holes in the Styrofoam. In my experience, 20 cm between the holes is a good compromise for a wide variety of crops. Pay attention to stay about 10 cm away from the edge of the styrofoam surface (a smaller distance leads to breaks in the styrofoam), and to position the rows of drills so that they are in a shift towards each other, for optimal use of space. You can crowd the drills up to 10 cm intervals from each other. Closer spacings are suitable for leafy crops that must be picked after no more than a month of growth, or for “skinny” crops such as chives and green onions.
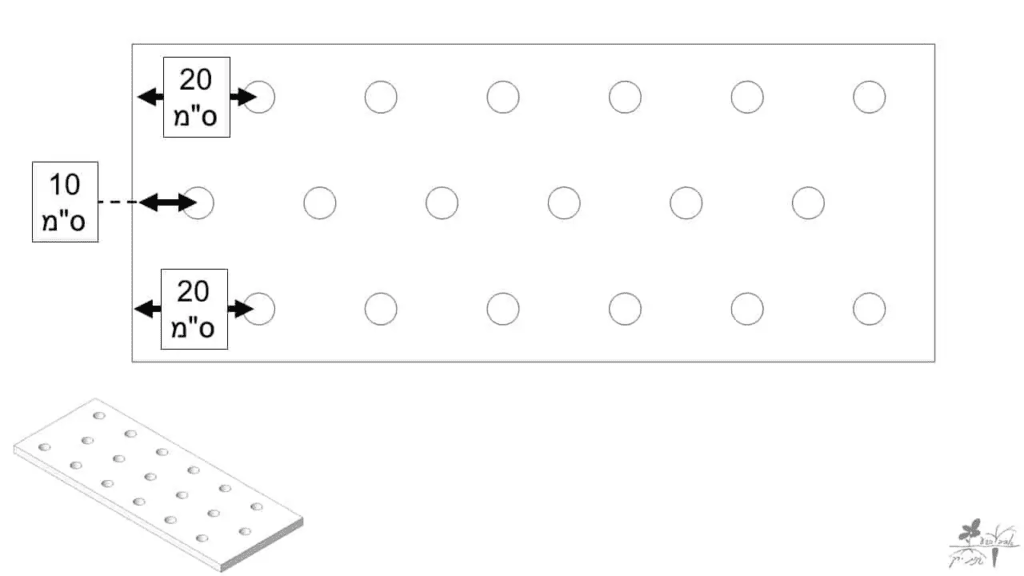
The recommended intervals between drills are:
- 30 cm: huge plants like zucchini, chestnut squash
- 25 cm: climbers like cucumber, tomato, bean
- 20 cm: generic spacing recommended for most plants
- 15 cm: leaf crops
- 10 cm: Microgreen, green onion, chives
Drill calculator
I made this to help you space the holes in your Styrofoam. enjoy 🙂
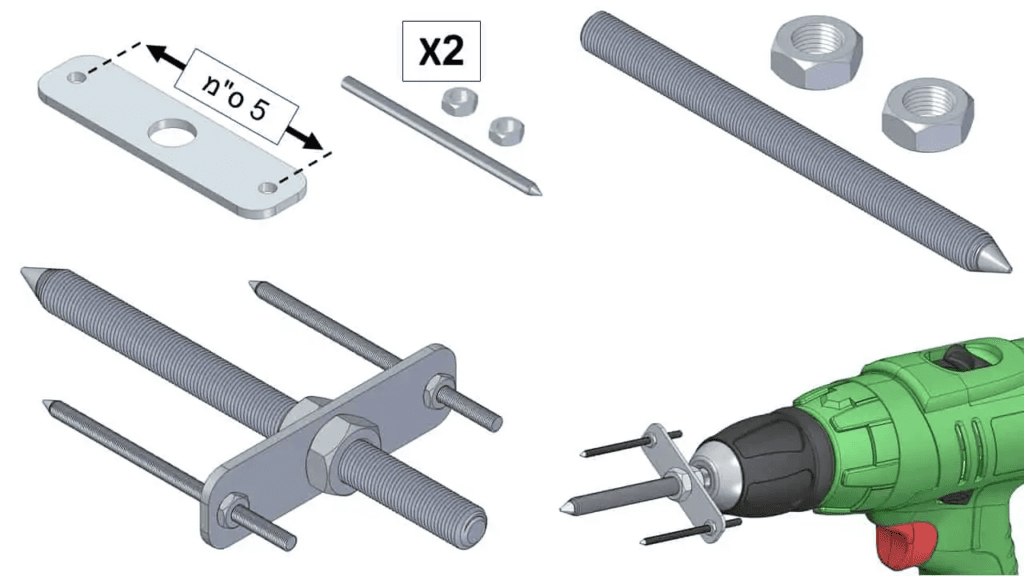
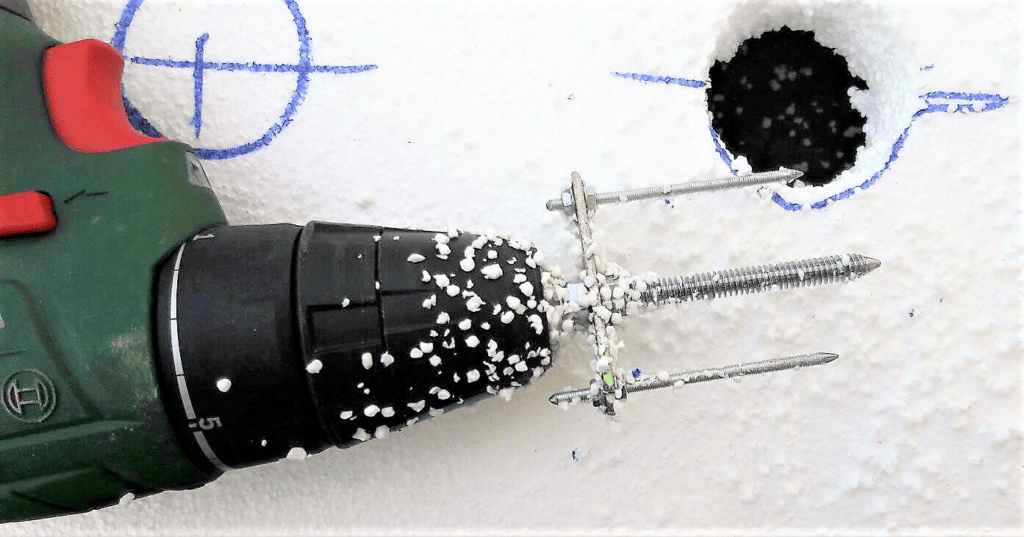
Styrofoam drill
Those with technical ability can make a Styrofoam drill at home. Usually they will obtain a rough bore, but it should work just fine. The materials are:
- A metal plate, with drills for the screw rods.
- A 3 mm threaded rod, sanded and sharpened at the end – 2 pcs.
- An 8 mm threaded rod, sanded and sharpened at the end.
- Nuts that match the threaded rods.
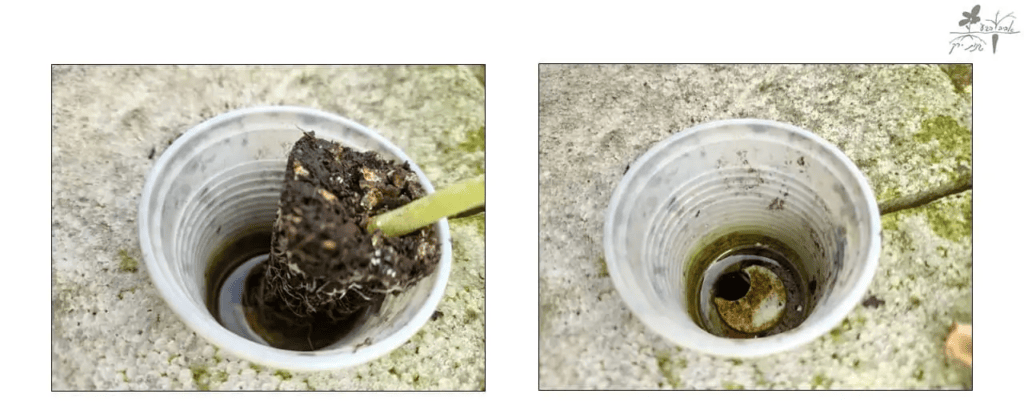
The planting cups
The planting cup is needed to hold the young seedling in place. You can fill the planting cup with tuff or hydroton, but in most cases it’s enough to place the seedling in the planting cup so that it touches the water just a bit. The water will rise with capillarity forces and moisten the peat soil that comes with the seedling:
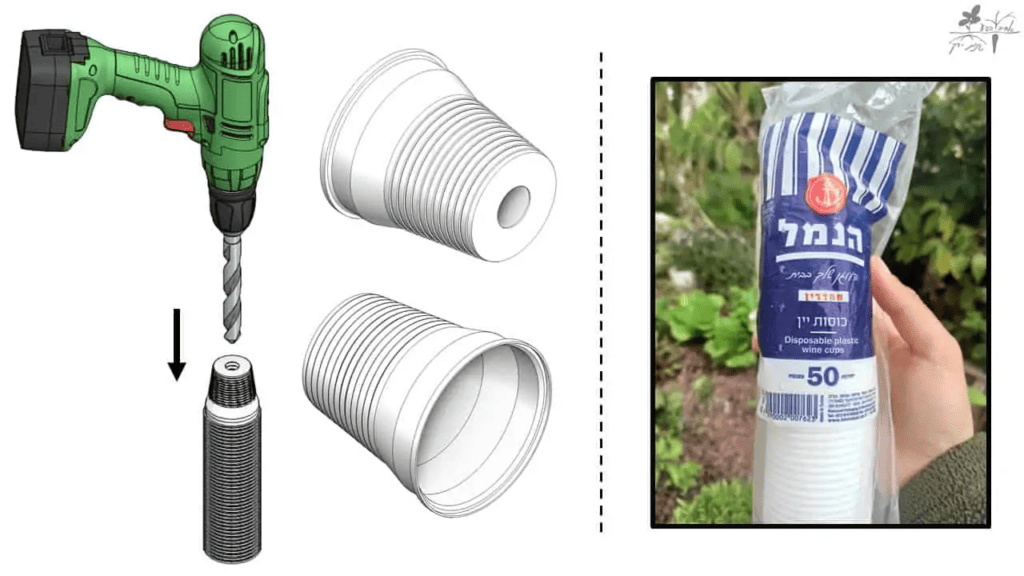
Preparation of planting cups
You can purchase black mesh cups or planting cones. And you can also make planting cups yourself from small disposable cups (“wine cups”). In small quantities, you can drill holes with a soldering iron or a nail heated on a wire, and in large quantities, you can drill them (carefully!) in the following way, using a 14-18 mm drill. These wine cups will suit leafy crops, not large summer crops like tomato and cucumber:
Air
The roots consume oxygen from the water, so the oxidation of the water is critical for the proper development of plants. Without oxygen the roots will drown (literally) and anaerobic decay will begin. Injecting air bubbles in the water introduces dissolved oxygen into them. It is customary to do this with an air pump and an aquarium air stone: use air stones with a diameter of 4 cm .
Pump selection
Air flow is measured in liters/hour. Choose the air pump according to the “liter for liter” rule of thumb: for every liter of water in the growth reservoir, a flow of 1 liter/hour is required. For example: for an 80-liter system, we’ll choose an air pump with a flow rate of 80 liters/hour or more.
Pump location
Place the air pump above the water level or add a non-return valve on the air line. Otherwise, in the event of a power outage, water may flow back into the pump, destroying it and causing the risk of electric shock. Note that if you use a non-return valve, you must purchase a more powerful pump – because the valve lowers the pressure and air flow. You can place the pump near the electrical outlet and stretch an air hose from it to your system. This method allows flexibility in the location of the growing system.
Water Movement
In large floating raft systems, there should be some movement and mixing of the water. In stagnant water, local nutrient deficiencies are created in the root environment, and the plants do not utilize the fertilizer in an optimal way. Any movement of water, even the smallest, will solve this matter – you can purchase a small solar water pump on Ebay or AliExpress, which will flow water from one side of the system to the other. A second option is to purchase a larger air pump. The stream of bubbles will move the water.
How to design and build a Flood and Drain type hydroponic system
background
In flood and drain systems there is a constant cycle in which the roots of the plant are exposed to water and air alternately. There are many ways to apply this technique, and in this article I will focus on emptying and flooding systems in which the growing bath is filled with an inert medium such as tuff or hydroton , which is an excellent growing medium for the plants as well as for a variety of beneficial microorganisms. These microorganisms help break down the remains of plant material and create a balanced and diverse environment, which also enables the use of organic fertilizers.
advantages
- Fast and healthy growth: the large population of microorganisms, combined with excellent air circulation make the Flood and Drain systems particularly successful and more resistant to diseases, stress conditions and heat loads.
- Variety of crops: Flood and Drain systems are similar to beds in the soil, which allows for a greater variety of plants to be grown compared to other hydroponic systems. Starting with the usual crops such as lettuce and leaf crops, through large fruit crops such as cucumber, okra and tomato, and even root crops such as radish and turnip which are not usually grown with other hydroponic methods.
- Growing from seed: the tuff/hydroton substrate is an excellent germination substrate that can save you quite a bit of work. Simply sow vegetables in the growing medium and watch your plant sprout and grow until it bears fruit or until it is transplanted to one place. Large seeds such as beans or zucchini are sown 1 cm deep, while smaller seeds such as lettuce or cauliflower can just be sprinkled over the moist growing medium.
- Versatile planting: planting in these systems is very similar to planting in the ground, and you are not limited in the locations of the planting holes as in other systems. You can plant the winter crops in high density for maximum utilization of the area, and space the summer crops properly.
- Cuttings: The cycles of flooding and emptying form a wonderful substrate for the rooting of a variety of plants. Creating successful cuttings requires a certain skill that warrants a separate article, but know that in these systems you can propagate spices, tea plants and many house plants simply by sticking a branch of them inside the tuff or hydroton.
- Organic Hydroponics: Flood and Drain systems are the only systems that can use organic fertilizer such as compost or worm humus. More on that later in this article.
Disadvantages
- Weight. Drain and overflow systems tend to be particularly heavy, and less suitable for roofs and balconies. If you grow on a roof or balcony, consult the building engineer, and consider switching to a floating tray type system that weighs less and functions similarly, or simply use the NFT system or floating rafts.
- Weeding: Just as you can sow directly into the system, wild plants can also sprout in it – if you let their seeds get there. However, weeding plants from the tuff substrate is extremely simple and, unlike compacted soil, does not require physical effort at all.
- Price: Flood and Drain systems are made up of many components, making them somewhat more expensive and complex compared to similarly sized deep water systems. It is not recommended to build an emptying and flooding system smaller than 1 square meter – if you are just starting out, start with a smaller and simpler deep water system, and later upgrade it to a large and serious emptying and flooding system.
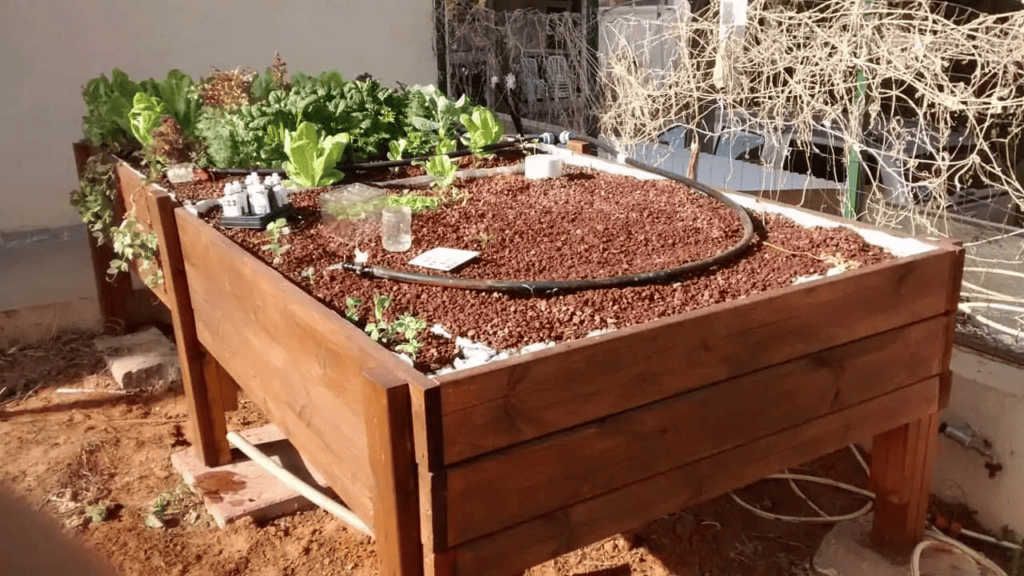
Choosing a growing medium
The most common growing media are hydroton, and tuff:
Tuff: The cheaper option and my preference. Choose a small tuff, 4-8 mm in size.
Hydroton: The touch of the tuff is rough and unpleasant for some people. If you have delicate hands, consider using hydroton. It is also considered more inert (neutral), compared to the tuff which may have a slight effect on the water acidity. On the other hand, hydrotons price is almost double the price of tuff. Whether you chose tuff or hydroton, before the first use of the substrate it must be thoroughly washed of the dust on it.
In summary, a good substrate is characterized by the following criteria:
- The grain size is 3-15 mm
- The water holding (“water absorption”) of the substrate is relatively poor, which improves drainage and helps fresh air reach the roots between flooding cycles.
- The substrate is inert and almost doesn’t affect the acidity or nutrients in the water (do not use gravel from a calcareous source, for example)
- The substrate is heavy and does not fly in the wind (do not use perlite and the like)
Organics
Compared to sterile systems like NFT, where the fertilizer must be of chemical origin and reach the plant in an available and ready form, in emptying and flooding systems with tuff there is a large population of microorganisms, capable of breaking down nutrients (and ammonia in particular) into compounds available to the plant. It is important to note that the produce grown in systems with fertilization from a chemical source is identical in quality and composition to that grown with organic fertilizers – however, organic fertilizer is much more environmentally friendly and has a lower cost.
In addition, it is possible and recommended to add red worms to Flood and Drain systems – they’ll breed independently, help break down plant material residues and release beneficial nutrients for plants.
The biological decomposition also allows the use of animal excrement as a source of fertilizer, in particular fish excrement. The field of aquaponics is a large and developing field, in which a fish pond is combined with a hydroponic system. The plants and microorganisms form a biological filter and clean the water for the fish, while the fish provide the nutrients for the plant. These systems are more holistic and complete, but require careful care and have some yield compromises compared to hydroponics. There are greater experts than me in aquaponics, so I will not expand further on the field: for more, you are invited to check Bob’s YouTube channel or the free UN book on the subject.
system components
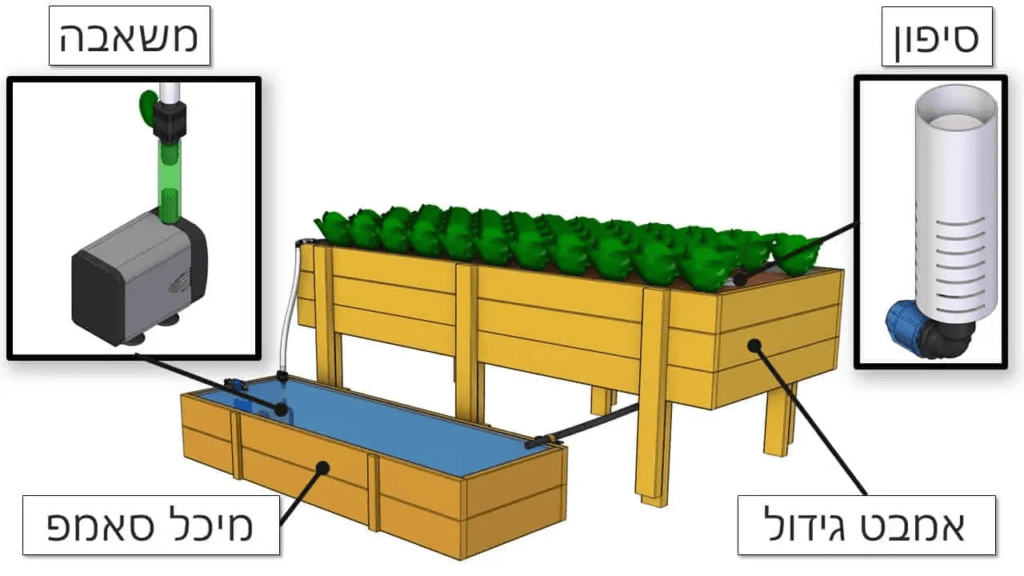
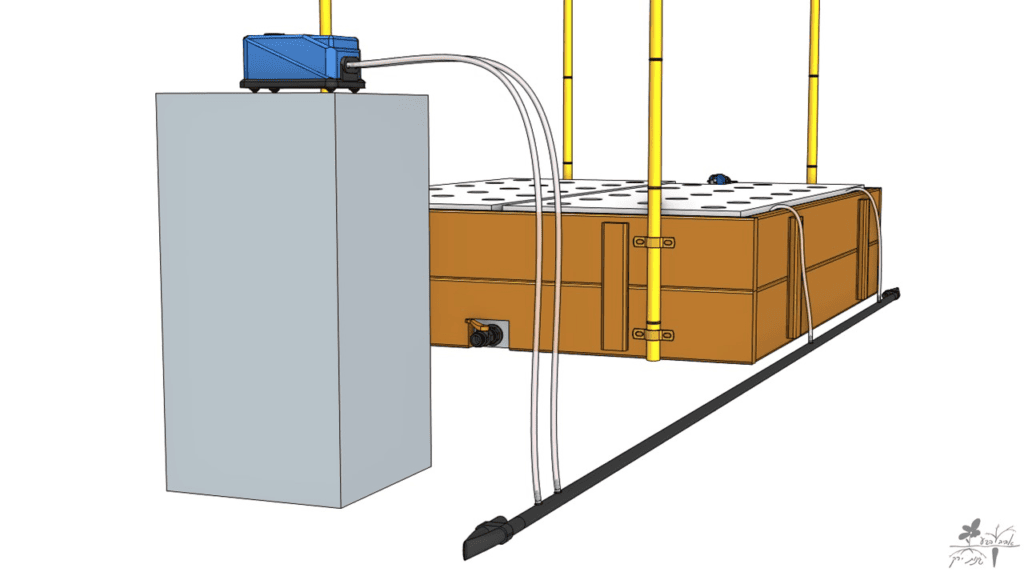
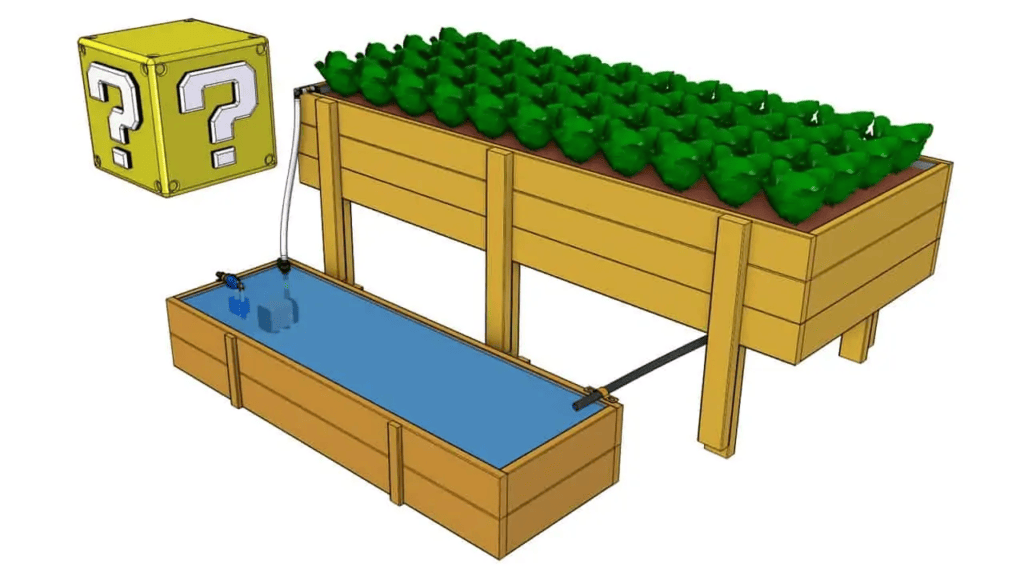
The growth tank
The tank contains the growing medium (tuff/hydroton) in which the plants grow. The recommended depth of the bath is 30 cm. A strong construction must be built so it can handle the weight of the tuff and the water. In the future I will detail how to build such a construction – but today there is already a lot of information on the subject. In particular, they looked at the option of using industrial IBC containers as a breeding bath.
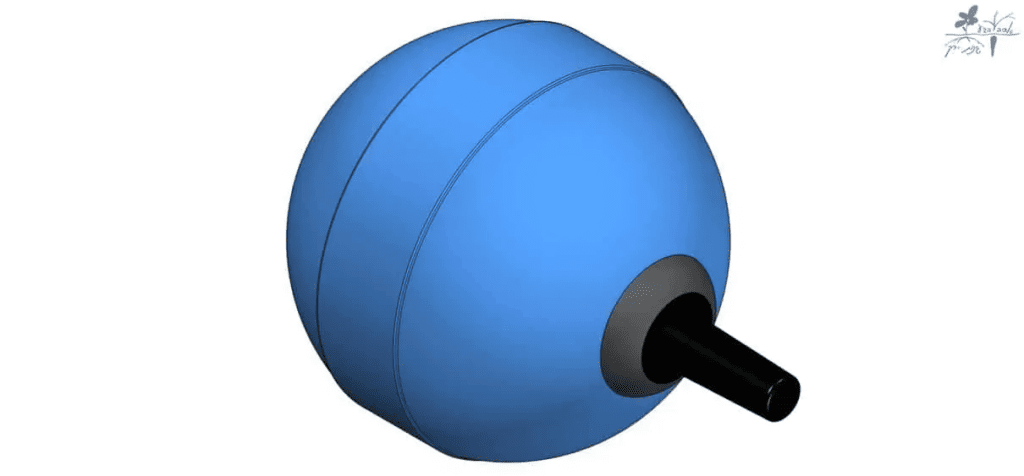
The sump tank
The sump tank is the tank into which the water drains from the growing bath, and from which the pump raises the water back into the growing bath. Therefore, it is requested that the sump tank be located lower than the growing bath. The sump tank should contain the amount of water in the grow tub. Since the growing tub is already mostly filled with tuff, the water in it only fills the spaces between the tuff stones, so the volume of the sump tank will be a little more than a third of the volume of the growing tank. You can use the construction instructions for a wooden water reservoir to build a low and aesthetic sump tank, and even put it under the grow tub to save space.
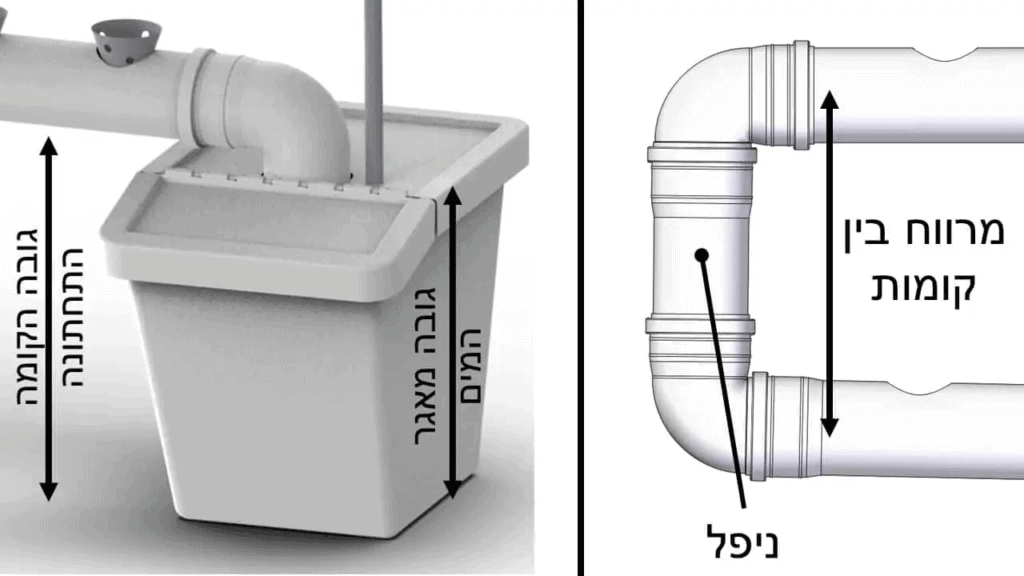
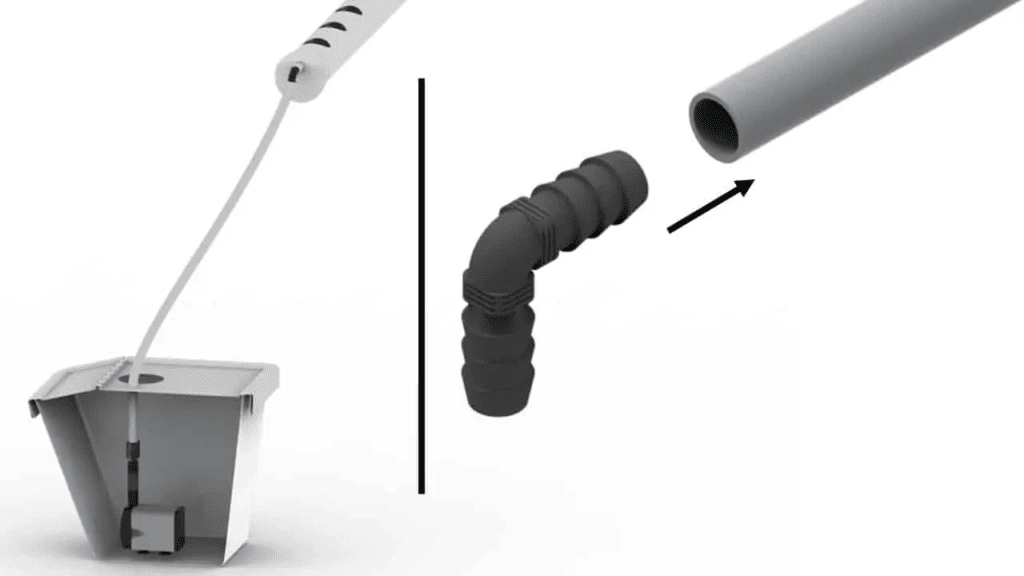
Bell syphon
The cycle of filling and emptying the water is usually achieved with the help of a bell siphon. You can turn the pump on and off alternately with a timer (Sabbath clock), but my recommendation is to use a bell siphon.
Below is a video that demonstrates well how this syphon works:
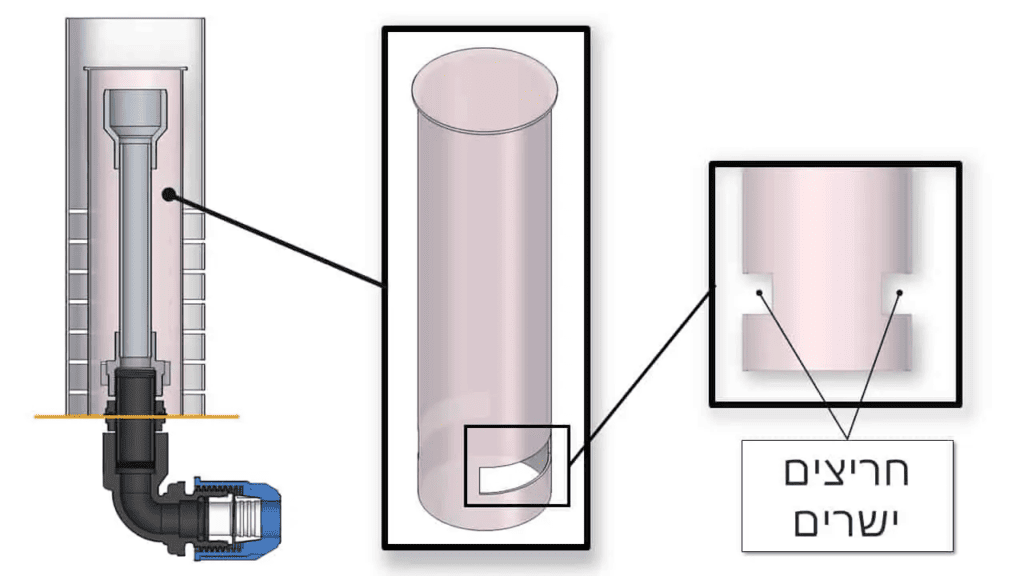
Building a bell syphon
The bell consists of three layers:
Protective canopy: Its function is to prevent the tuff from entering the mechanism, and to allow easy access to handle the syphon. To create the canopy, you can use a perforated plastic box, or a piece of grooved PVC pipe.
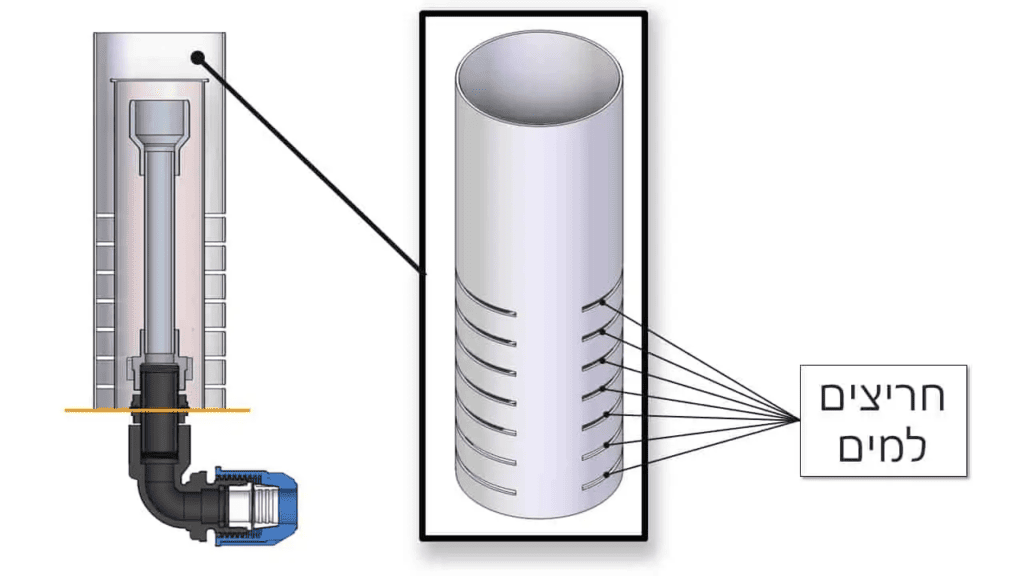
Bell: This is the element that creates the vacuum for sucking in the water, and it is built from a cylinder that is closed at the top. It is important to create a horizontal slot in the bell (and not drill holes), to allow a quick entry of air when the emptying is finished, and to prevent the water from sticking below. The height of the grooves in its base determines the minimum height of the water. To create the bell you can use PVC piping, a cut plastic bottle or any other sealed cylinder.
Funnel: The shape of the funnel encourages the beginning of the suction by flowing a lot of water in relation to the diameter of the pipe, thus preventing the water from “getting stuck” at the top. The diameter of the funnel should be twice the diameter of the pipe behind it. In addition, pay attention to the height of the rim of the funnel, which determines the maximum height to which the water will reach: this height should be about 5 cm below the surface of the tuff.
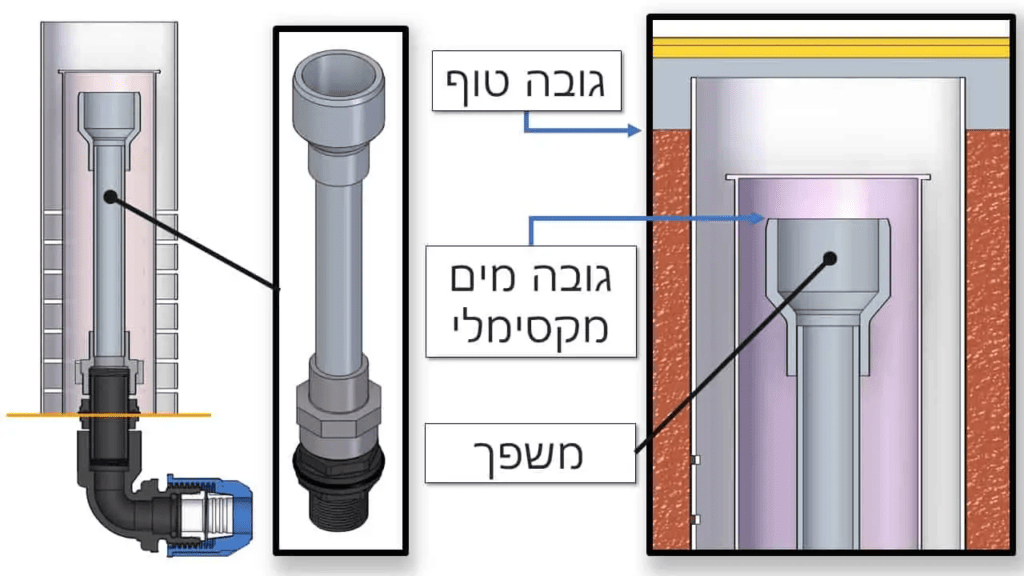
Also, when planning the bell, you should pay attention to the following details:
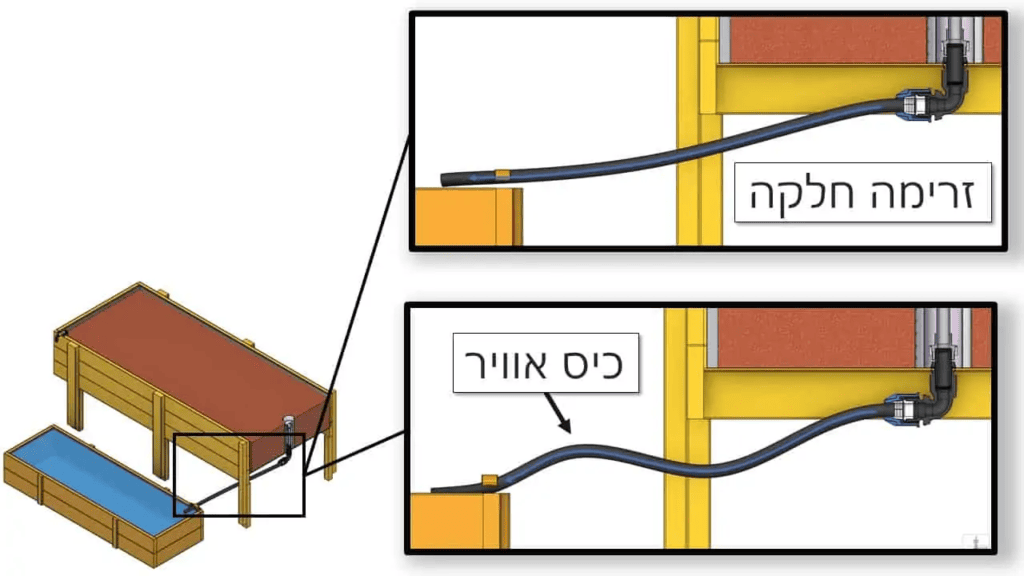
Breaking the direction of the flow: you should install a 90 degree angle at the bottom of the syphon. Breaking (changing) the direction of the water flow causes a build-up of water pressure up the pipe and helps to fill the pipe with water only and without air bubbles: an essential element for starting the suction operation.

The drain pipe: the pipe through which the water drains from the syphon to the sump tank should be at a moderate and constant downward slope. Any upward deformation of the pipe may create an air pocket that will prevent the proper operation of the syphon.
Pump
Water flow: It is desirable that the system go through approximately two cycles of emptying and flooding per hour. Use a submersible pump with an appropriate flow rate – to calculate the flow rate, take the volume of the growing bath, divide it by three (only one third of the volume of the bath is water, the rest is taken up by the growing medium), and multiply by two – this is the volume of water you must flow per hour. For example, a grow bath with a volume of 600 liters will need (600/3)*2 liters per hour, which is 400 liters/hour. Keep in mind that the flow data on the pump packaging shows a maximum flow at zero height – the decrease in flow must be calculated according to the height to which the water must rise. There is usually a dedicated table on the back of the package. In addition, remember to leave for yourself the option of final adjustment of the flow with the help of a faucet (as detailed below).
Faucet :It is important that you have control over the rate of water entering the growing bath. A water flow that is too low will not allow the suction operation to start, and the water will get stuck at the highest level. Too high a water flow will not allow enough air to enter to finish the suction, and the water will get stuck at the lowest level. That’s why you should choose a water pump with a slightly higher flow rate, and connect a faucet to it with the help of which you can adjust the exact flow rate.

I would like to thank the LivinGreen company for the help in modeling the bell syphon
.